


Terminal
Overcoming Your Fear of Using the Terminal
For years, I’ve been afraid of the Terminal. I was scared that I would erase my entire hard drive with a single typo. 😱
But, then I started using a task runner to compile my Sass (among other things). My world changed. I found it to be so much faster and allowed far more task automation than the tools I had been using previously. IMHO, anything that will speed up your workflow is worth investing in (whether that’s time or money).
Once I started spending more time in the Terminal, I became more comfortable and confident. Trust me, I still prefer a good GUI (graphical user interface), but I’m no longer afraid I’m going to delete my entire hard drive. — And let’s be honest, you could delete your entire hard drive with a GUI, too. Drag your hard drive to the trash and click "Empty Trash." But, nobody in their right mind would do that. Similarly, you’d have to type a very specific command in the Terminal to delete your entire hard drive and nobody in their right mind would do that either. — Plus if you have a typo in the Terminal, it will tell you and the command won’t run.
Here are the commands that I've found to be the most useful.
💡
Note
When you see examples of commands to run in the Terminal, usually you'll see a $ at the beginning of the line. Don’t copy the $ , it just signifies that it’s the beginning of a new line in the Terminal.
Changing Directories
cd stands for change directory. Similar to the Finder where you click on the folder, in the Terminal, type the name of the directory that you want. In my example, Sites is the name of the folder.
1
$ cd SitesYou can type cd .. to go up a level or cd ../.. to go up 2 levels. cd / or cd will take you to your home directory.
The Terminal also supports tab auto-completion. Meaning, you can type cd De<TAB> and it will fill in cd Desktop for you. Handy!
Listing a Folder's Contents
ls will list all files and directories in your current location. If you want to see "hidden" files or files that start with a . Simply, add a "flag". You can think of a flag as a way of modifying your command or adding preferences. In our case, ls -a.

If you want also want to see who owns the file and its permissions use ls -la.
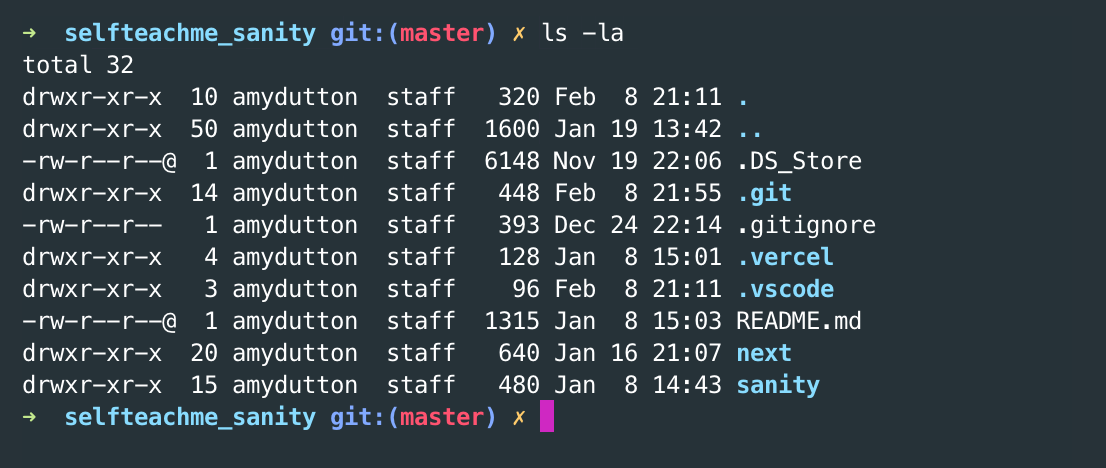
pwd will show you the current file path for your current location.

Making a New Folder (or Directory)
mkdir FOLDERNAME will create a folder named FOLDERNAME. mkdir stands for "Make Directory."
---
Anytime, you hit the up arrow on your keyboard, it will fill in the last command you ran. Hit it again and it will cycle to the command before that. The down arrow cycles in the opposite direction.
Just to give you an idea of how these commands are used together: when I first open the Terminal, I might type ls to see what my file/folder options are. Then:
1
2
3
$ cd Code/GIT/
$ mkdir NEWPROJECT
$ cd NEWPROJECT
This navigates to the GIT folder and then creates a new directory for a project. Then, navigates inside the folder I just created.
If this is still making your head spin, here’s a WYSIWYG (What you see is what you get) way that makes this even easier:
- Open up your Terminal type in
cd . - Then, open up Finder, navigate to the folder you want to open in Terminal
- Drag that folder from the Finder onto your Terminal window. It should enter the location for that file path for you.
- Now, hit <RETURN>. — You’re welcome.
;tk I HAVE A CHEAT SHEET OF TERMINAL COMMANDS THAT YOU CAN DOWNLOAD FOR FREE
Trees
;tk
---
If you’re feeling ambitious, a few other tips and tricks:
Install a Terminal Alternative
I use Hyper instead of Mac's default. It has a little bit more functionality. Doesn't hurt that it's FREE!
I have the Cobalt2 Theme installed so it looks a little nicer. It's pretty easy to install, within the Terminal 😱 type
1
nano ~/.hyper.jsNano is a text editor for the Terminal. Nothing to install.
If you're looking at the Cobalt2 Theme documentation, you may have noticed that nano isn't listed anywhere, but vim is. Vim is another text editor for the Terminal that is available out of the box. Feel free to use this, but it can be a little more frustrating to use and require a little more domain knowledge, with its custom keyboard commands.
Start looking for a link to the plugins line. You'll notice a list of commands at the bottom of the editor.
If you're on a Mac, you can hit Ctrl+W (for Where Is?). A line will appear at the bottom of the screen for you to enter your search terms into. Type "plugins" and hit ENTER.
![]()
Change the line that says
1
plugins: [],to read:
1
plugins: ["hyper-cobalt2-theme"],If there's something already listed inside your brackets [], maybe:
1
plugins: ["hyper-drop-file"],You'll want to keep the item that's there and just add hyper-cobalt2-theme to it:
1
plugins: ["hyper-drop-file", "hyper-cobalt2-theme"],Celebrate!
![]()
If Hyper isn't your jam, no worries. We can still be friends. I won't hold it against you. But, you may want to try iTerm2 -- can you tell, I really just don't like the default Mac Terminal?!
Set up a Hot Key to bring up Hyper, wherever you are
I love the keyboard and shortcuts. It makes me so much more efficient and productive. As I'm developing and navigating between different programs, I like having a keyboard shortcut that will pull up the Terminal, wherever I am.
I've solved this with Alfred. Alfred is a Spotlight replacement. It can do everything that Spotlight can, plus more. One of its superpowers is custom workflows.
![]()
Go to the bottom and click on the + button. Select Blank Workflow.
![]()
Give your workflow a name.
![]()
You should see a blank screen that says "Right (or ctrl) click to add a workflow object." Pretty intimidating right? All good, right-click and select Triggers > Hotkey from the menu.
![]()
A window will appear, asking you to set the hotkey. Hit the shortcut that you want to use. It will fill in the value for you. I'm using Cmd + Alt + Spacebar. Click on the Save button.
![]()
Right-click on the canvas area again. This time, select Actions > Launch Apps / Files (see the potential here?)
![]()
Another window will appear. Drag and drop the application (or file) that you want to open into this window. In our case, this is Hyper.
![]()
Awesome! Now, your hotkey will work. Try it! 💥
Lightning Round
I’ve always wondered how people were able to customize their Terminal to be colorful with unique prompts.
Then, I was introduced to Oh My Zsh = Pure Awesome 😎
Even if you're colorblind or don't care about Terminal colors, there are other shortcut codes packaged within Oh My Zsh that make Terminal life even better.
This is even easier to install via curl. Per the documentation on GitHub, just copy and paste the following line into your Terminal (remember you don’t need to copy the $ sign):
1
$ sh -c "$(curl -fsSL https://raw.githubusercontent.com/ohmyzsh/ohmyzsh/master/tools/install.sh)"Start Zsh by restarting Hyper or opening a new command window.
There are plenty of themes to choose from. But, as you probably guessed, I'm using the Cobalt2 theme for Oh My Zsh, too. robbyrussell is pretty great, too.
Triple Bonus
As I mentioned earlier, “Oh My Zsh” has several shortcuts included. For example, instead of git status, you can use this abbreviation gst.
Still not convinced? These might not sound like much, but the more you live in the Terminal, the more time it will save you.
All of these shortcuts are considered plugins. You can check out all the ones that available on the Oh My Zsh’s wiki page.
Once you decide which plugins you want to use, you can activate them, similar to setting the theme.
1
$ nano /.zshrcFind the line that says plugins=()
Include the plugin name within the parentheses.
Mine reads:
1
plugins=(git composer gatsby rails npm laravel5 osx z)Quadruple Bonus: Advanced History
Oh My Zsh has an advanced history feature. Start to type a previous command and then hit the up arrow. It will start to cycle through all the previous commands that match.
Quintuple Bonus: File Tabbing
;tk
Last Trick
I have an "alias" or a keyword set up so that anytime I want to navigate to my projects directory within Hyper, I just type projects and poof I'm there. Essentially, it’s the same as typing cd ~/Code/GIT/ (just in case you were wondering the ~ references your home directory. If you’re not sure what I’m referring to, just type cd ~ and then pwd or ls in the Terminal. You’ll see.)
If you still have your preference file open (nano ~/.zshrc), look at the bottom. There are a few examples already set up, but commented out (the # in front means the line is commented out). Add a line at the very bottom, below the examples, that reads alias projects="cd ~/Sites". -- or wherever you keep your projects / code.
Then, write out the file (Ctrl + O) and exit (Ctrl + X). Restart Hyper (or open a new command window). Test it out. Nifty!
- Something
- Else

Comments
This industry moves fast, but you can stay up to date:
Receive a weekly email of the Internet's best from articles, to tutorials, to pro tips.