


Over the past few years, video backgrounds have become a popular design trend. So, how do you do it? What are the best methods for file compression? and what about coding out the HTML and CSS?
-- And, really video backgrounds aren't as hard as you might think. Like most things, if you don't have experience and you've never implemented a video background before, the unknown makes it seem difficult or intimidating. Let's remedy that.
What's the Point?
Before we jump in, the designer and digital strategist in me wants to ask: "Is it really necessary? What’s your reasoning?"
Recently, I redesigned a client's homepage. They are the world's largest manufacturer of precious dental alloys (the metal in your mouth).
Their process is nothing short of amazing. They use 3D scanners to create digital images of a patient's mouth. Then, they layer in 3D renderings of their product. Once approved, they use 3D printers to create all the necessary parts.
How do you showcase that? That’s the story! That’s why people buy from them over someone else: their process, their workflow, their employees, and the relationships that they build with their customers. That's the difference. That's what we want to showcase!
But, that is also harder to sell through a static image...But, with video, it's really easy to demonstrate. So, that’s what we did. We used a background video to showcase their 3D software, milling machines, and 3D printers.
Doing the Work
The Actual Files
You need three different files to make everything work:
- The video file in .mp4 format
- The video file in .webm format
- Fallback image
Historically, the .webm file was used for Firefox, and the .mp4 was for all other browsers. But, now-a-days, .webm is default (web movie).
There’s also a third format you can use: .ogg. Opera advocates this format. – Honestly, I usually don’t bother. (Sorry, Opera!)
The fallback image will be displayed as the video file is downloading and buffering in the background. You can take two different approaches:
- A great image that communicates your point if no video is ever loaded
- A screenshot of the first frame of the video, so that when the video does play everything appears to be seamless.
At first glance, option two sounds like the ideal solution, but just remember, the first frame isn’t always flattering — and if your video fades in (from black or white) — well, then, that’s a no-go.
Regardless of what solution you decide to use, I would recommend making the background image the same size dimensions as your video.
Compressing the .mp4 File
I have Adobe Media Encoder on my computer. It’s great because it works well with After Effects and Premiere (Adobe’s video software suite).
However, I realize that Creative Cloud is expensive. But, have no fear! There are plenty of other options out there. Besides, who doesn’t prefer cheap and easy?!
I would recommend downloading Handbrake, it’s free. I’ve used it before to rip DVDs (legally), but it’s also great for compressing video files. Hey-O!
Download the app, unzip, install, and launch. Then, drop your (large) video file in.
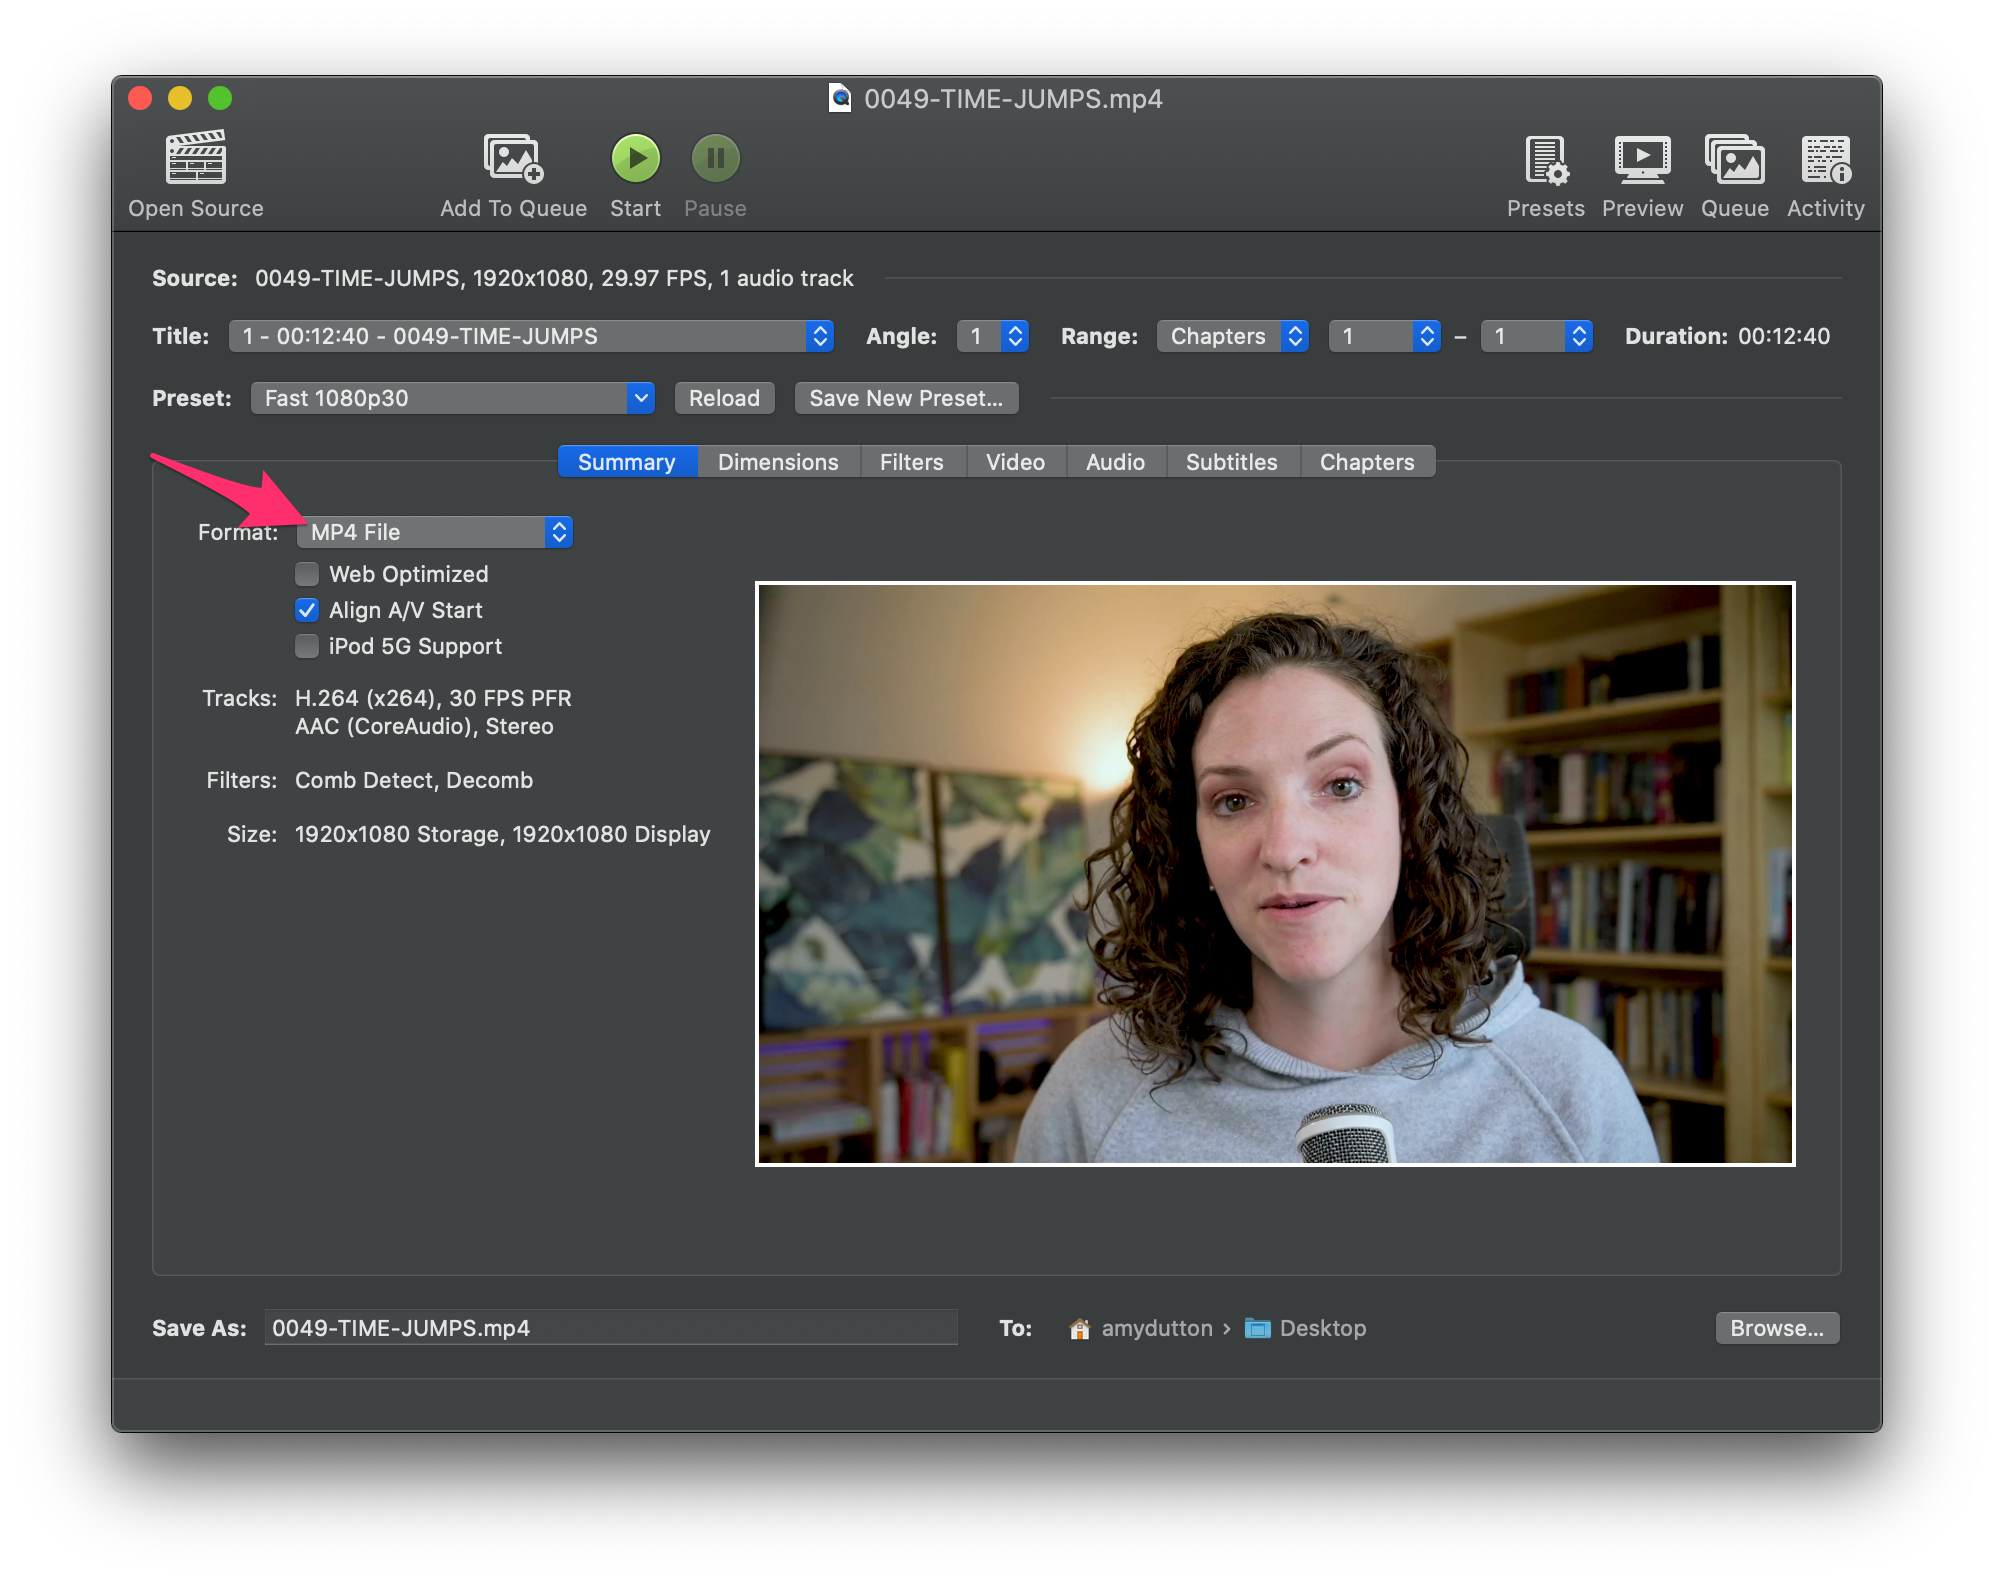
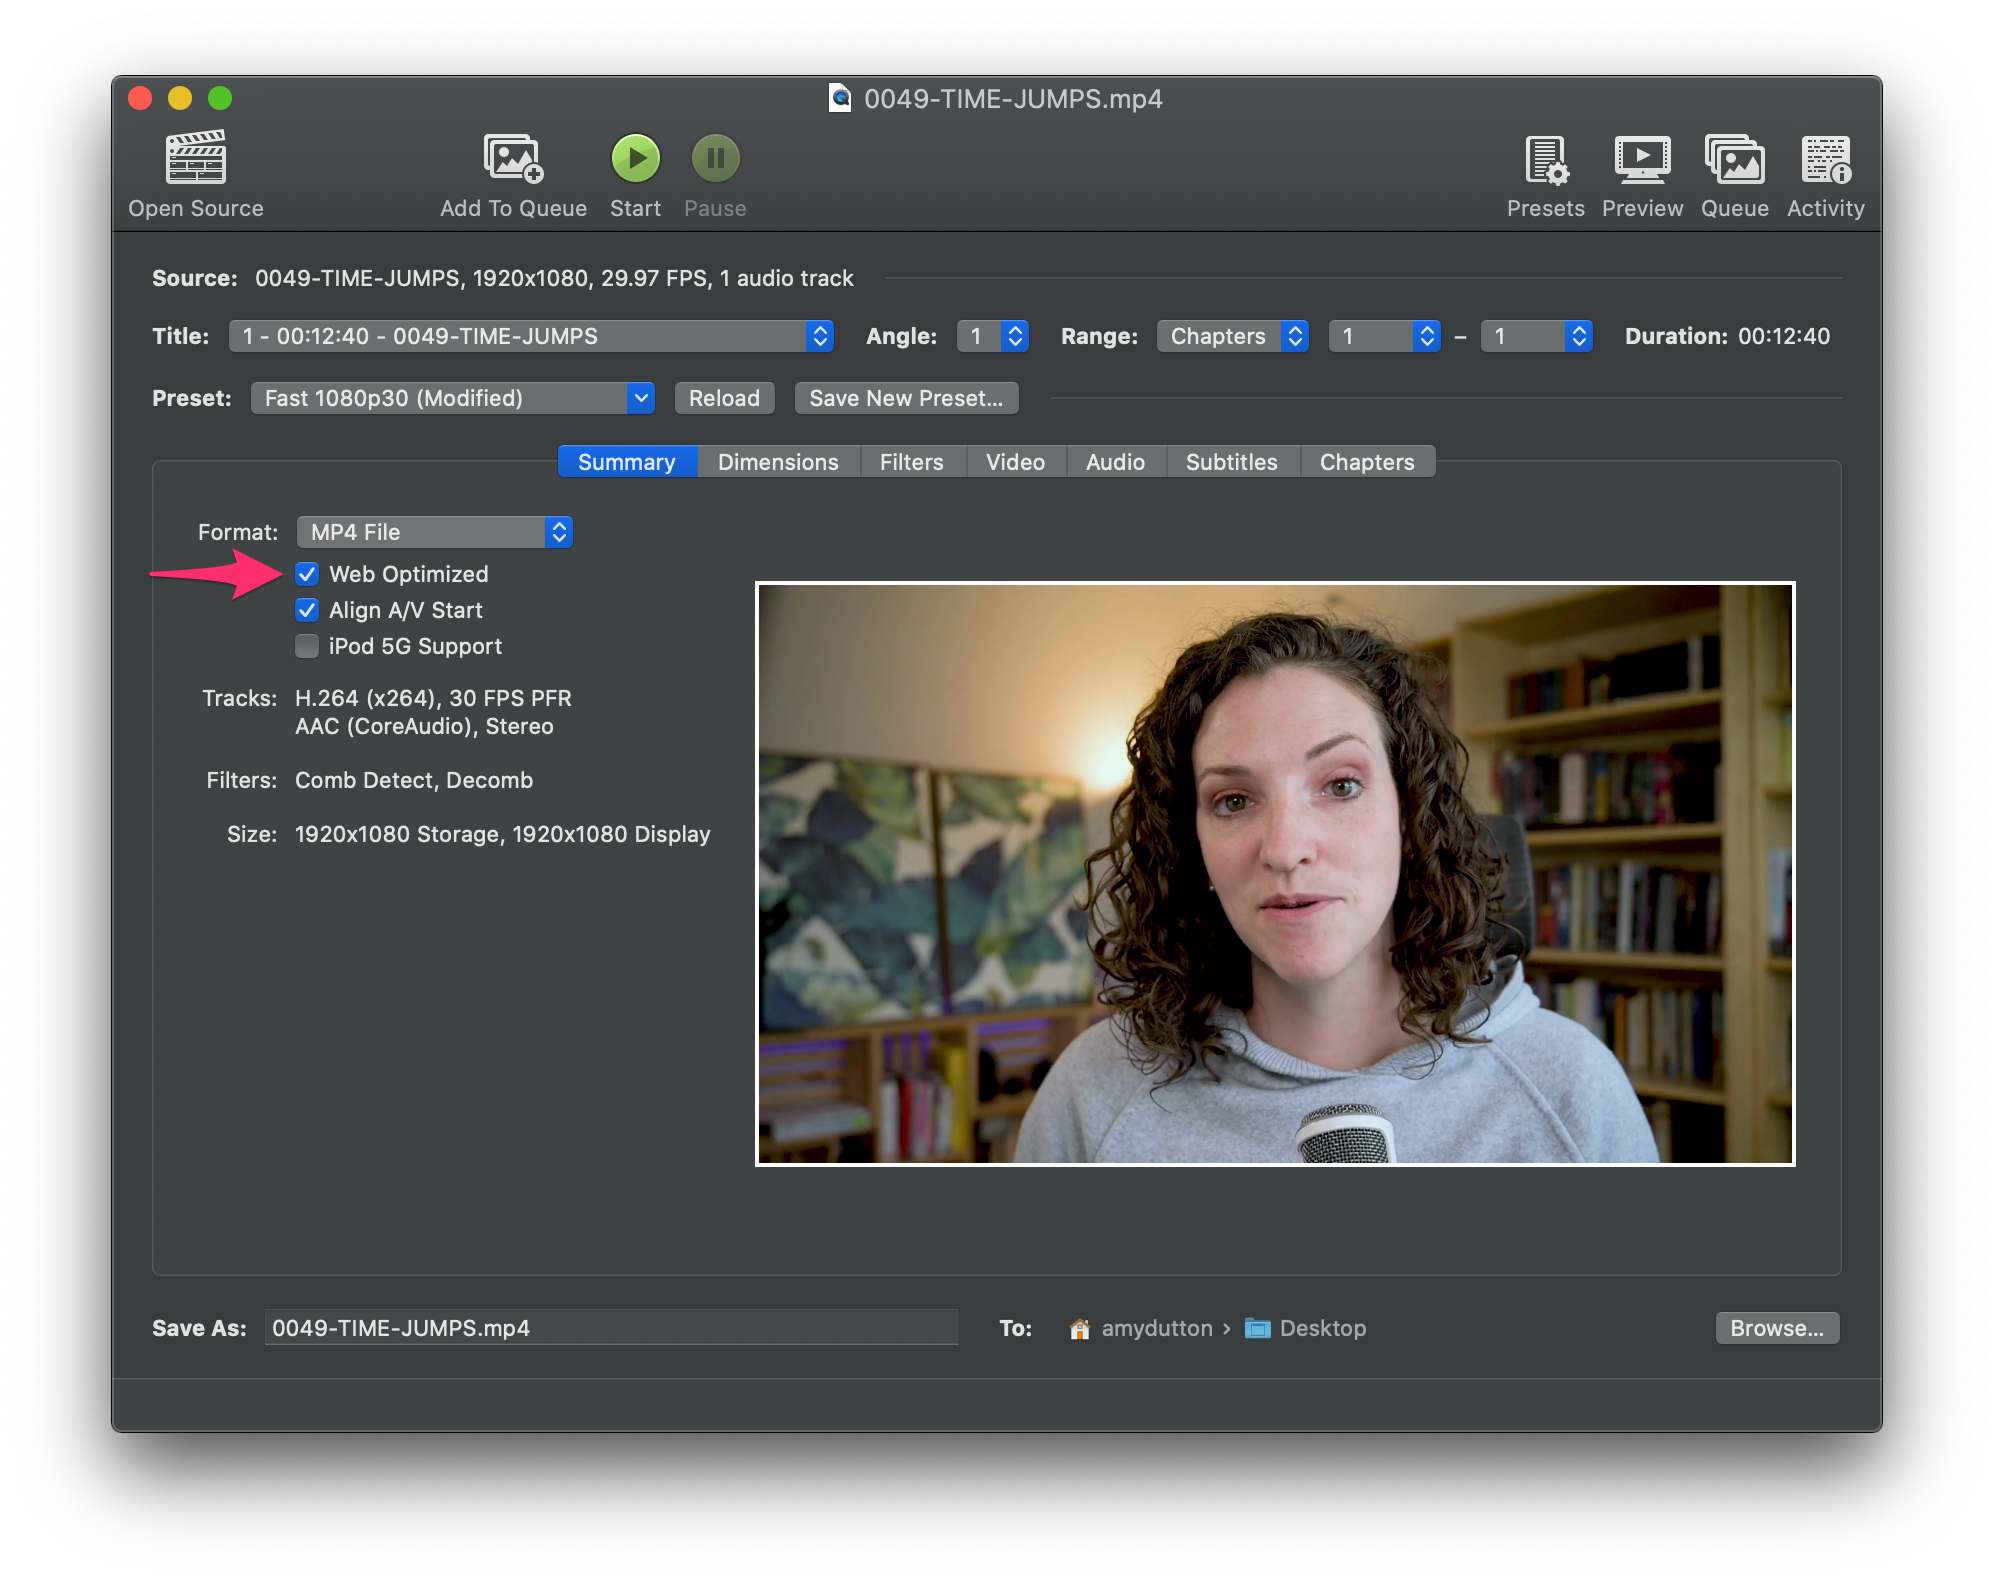
Under Preset, Format select MP4 from the dropdown menu. Make sure the Web optimized checkbox is checked.
All the other settings should be fine. Click Start in the toolbar.
Easy Peasy, right?
Compressing the .webm File
Unfortunately, .webm is a little harder to account for. The easiest solution I’ve found is to download another (free) app, called VLC Media Player. It’s an “open source cross-platform multimedia player and framework that plays most media files.”
Same as before, download the app, unzip, install, and launch.
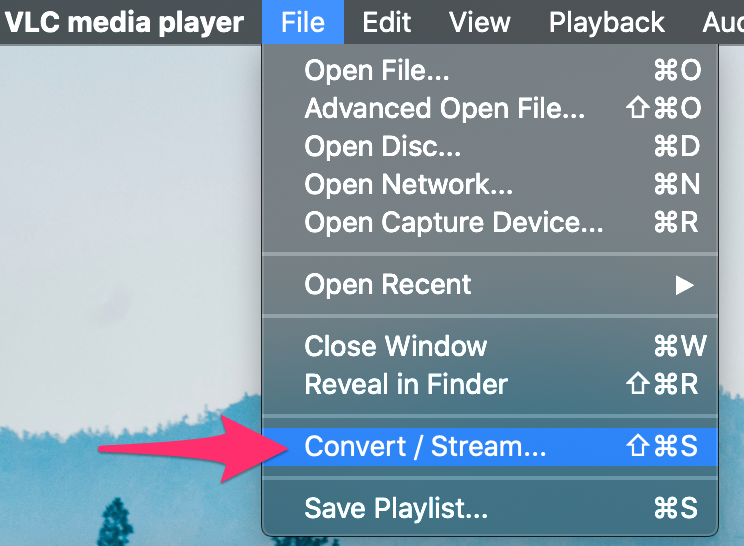
Within the main menu options, go to File > Convert / Stream. Another window will appear where you can drag and drop your media file.
I'd recommend starting with the original, large video file, again. Sometimes compression and file conversions do weird things when you’re compressing a file based on a file that’s already been optimized and compressed.
Under the Choose Profile section, select Video – VP80 + Vorbis (Webm).
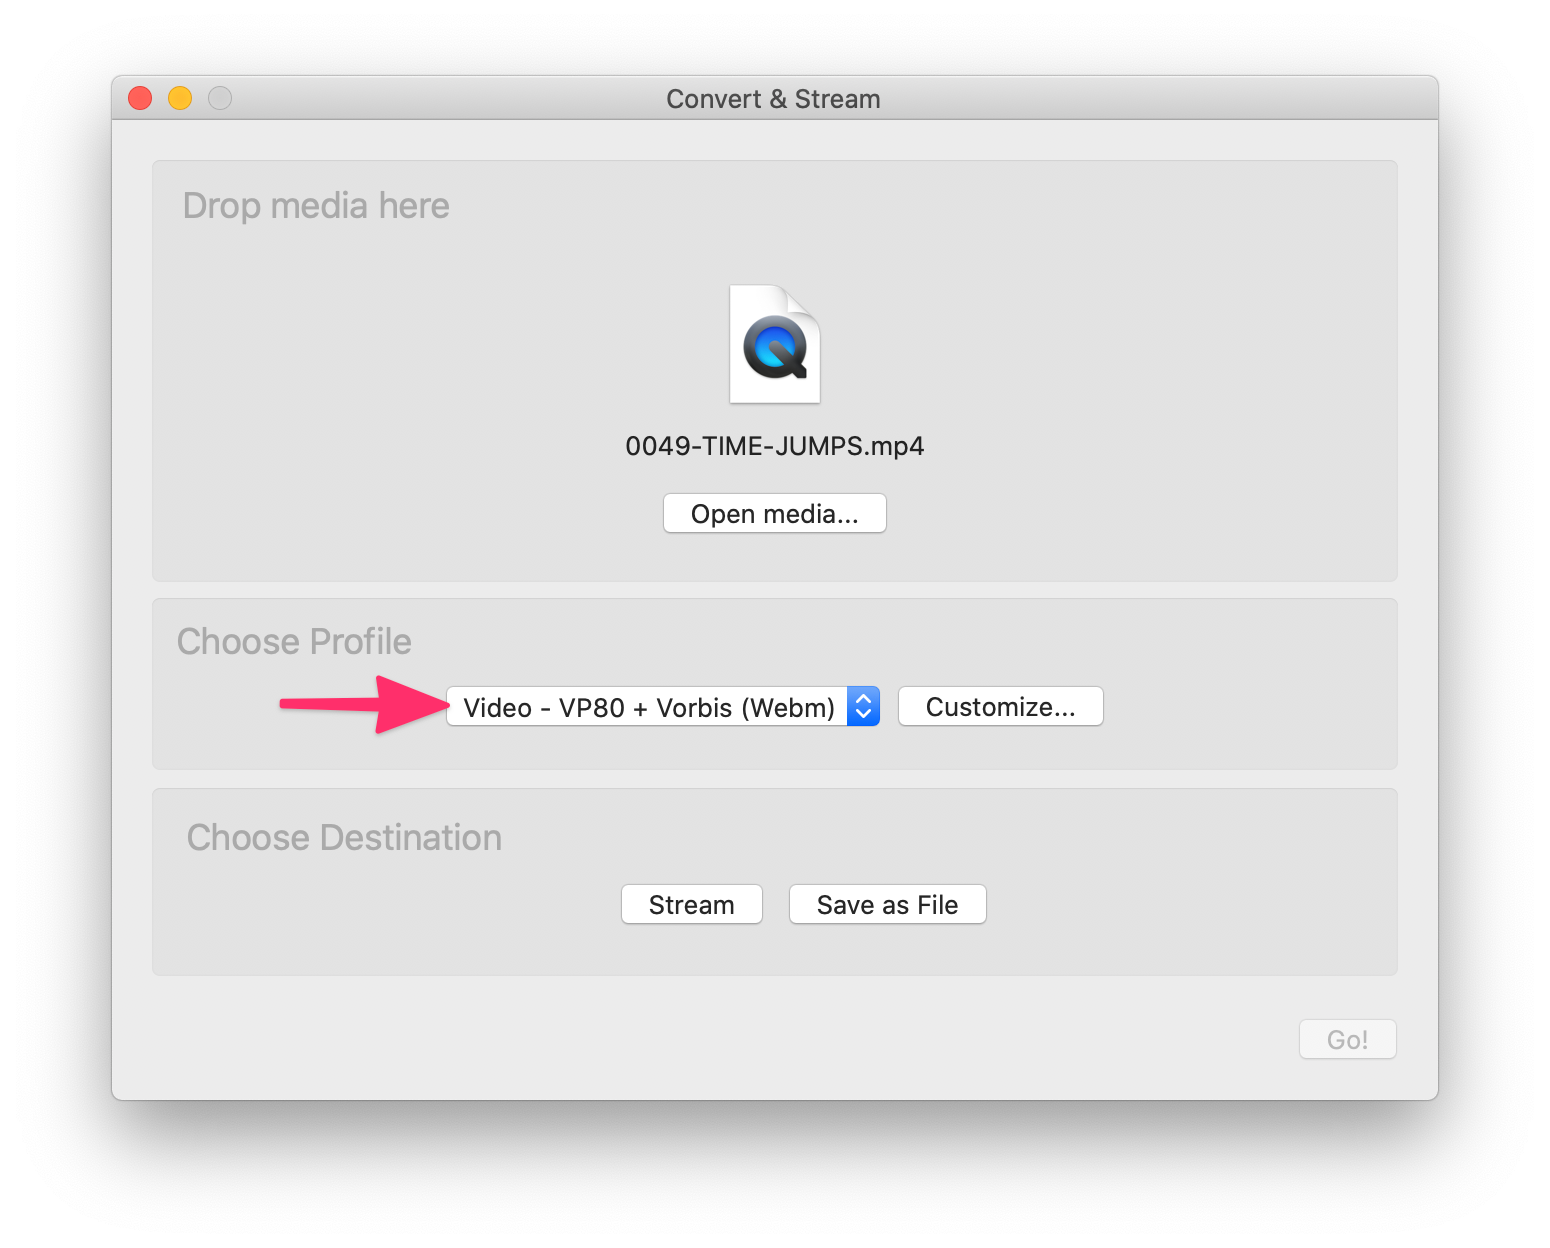
In the Choose Destination section, click the Save File As button.
Then, click the Browse button to choose where you want the video to save.
Click the Save button.
The video will start converting. One thing that wasn’t immediately obvious to me was the video’s progress. But, you may have noticed, once you hit the Save button, the Library window appeared with your video listed in the Playlist.
At the bottom of the window is a play bar. You should notice it slowly moves to the right as your video encodes. — That’s the progress bar.
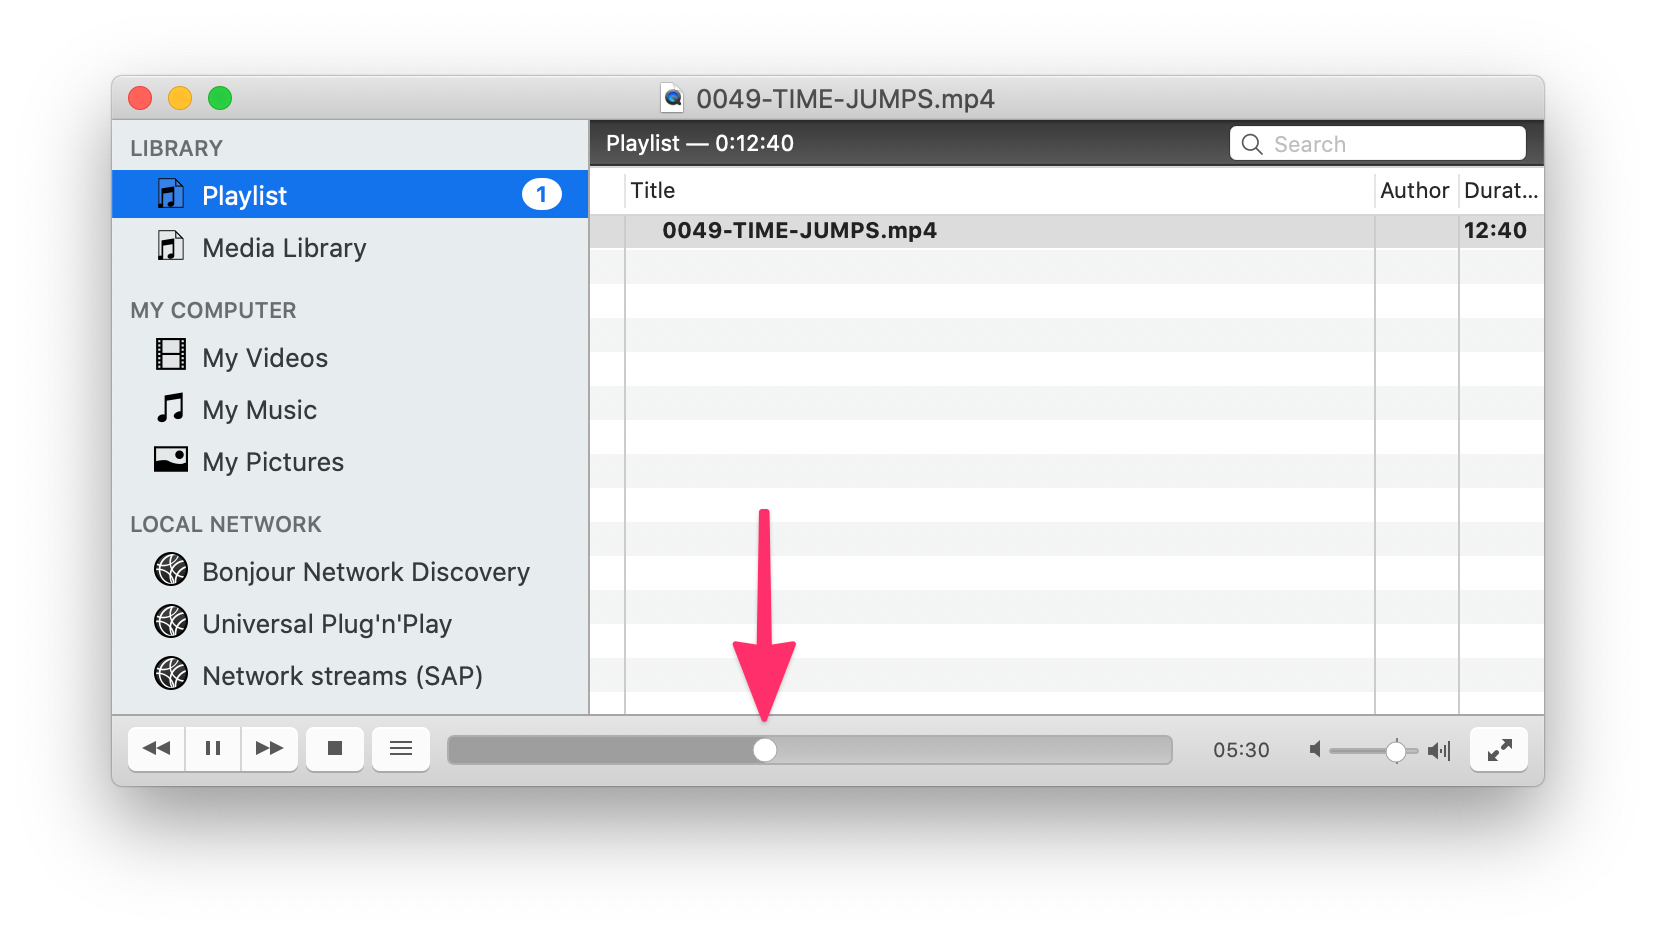
Perfect.
Storing Your Video Files
So, where do these files go? Placing them on your server somewhere convenient is the obvious (and probably easiest) answer, but I would challenge you to consider opening an Amazon S3 account and placing them there. Not only is Amazon S3 cheap, but it will also offload some of the work from your server, preventing it from being bogged down. Plus, this is really the type of thing Amazon S3 is designed for! — In fact, did you know Netflix actually keeps their video files on Amazon S3?! Crazy.
The HTML
Before we start writing code, let’s look at a design comp of what we’re trying to achieve.
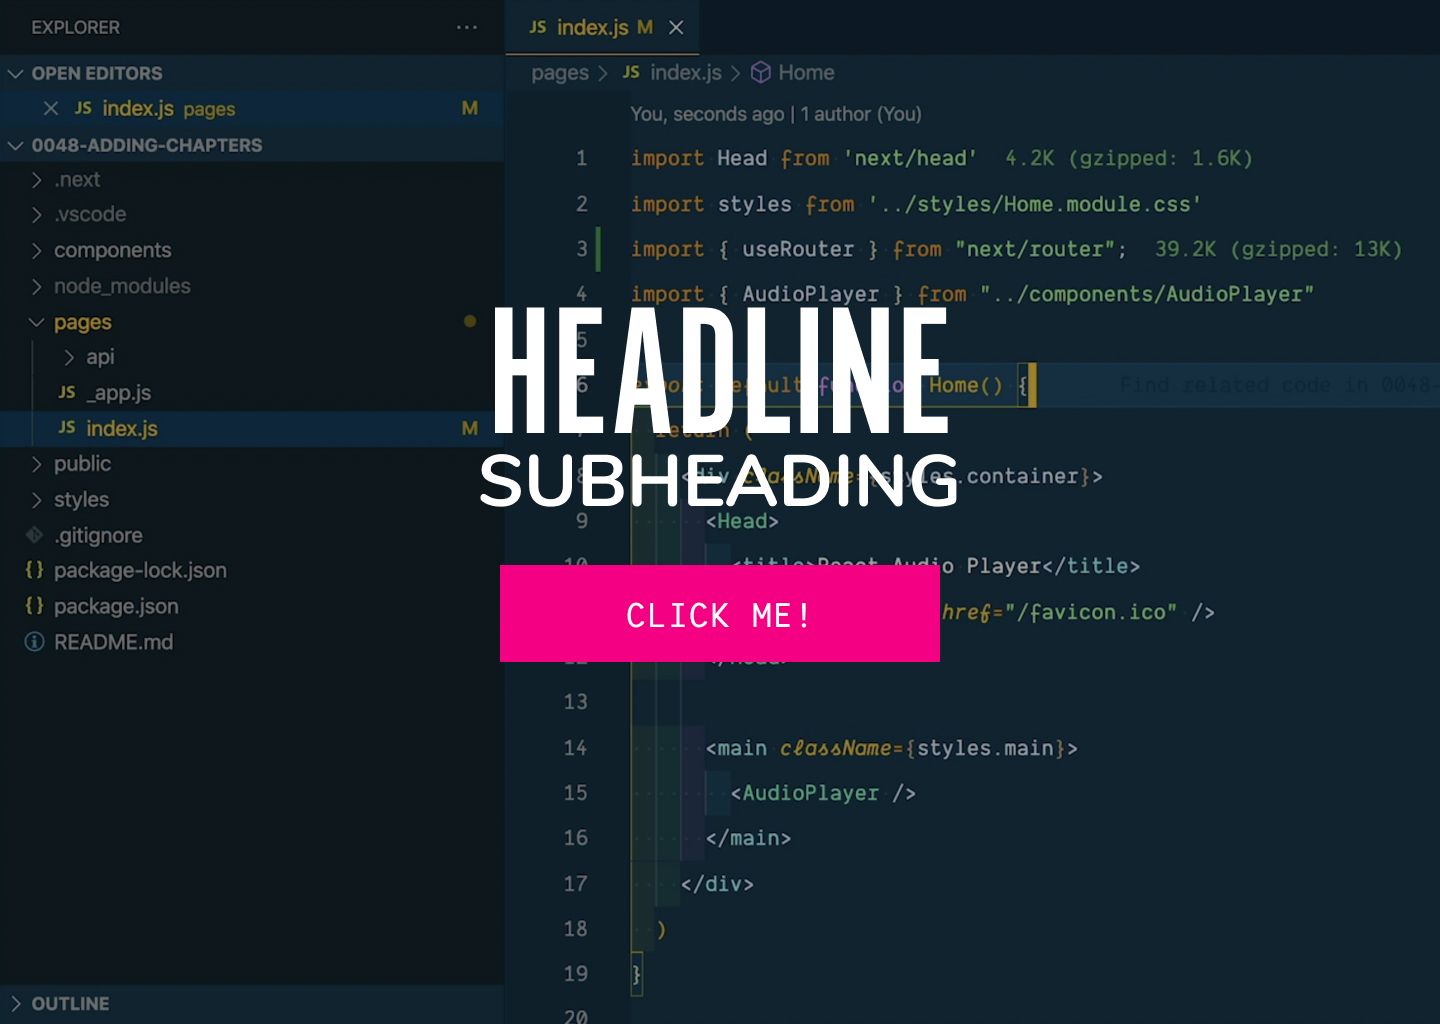
We have a video, with text overlaid, including a call to action button. It seems easy enough. But, let’s talk through some small caveats.
Text on Top of the Video
You could just make the text part of the video. But, if you ever wanted to change the text, you’d have to re-export and re-compress the video file. = Yuck!
Plus, the text could be pixelated — and just to pile on, who knows how that text will be displayed on multiple devices? You want to control that! Responsive all the way! (not to mention accessible)
Better to keep the video file separate and use HTML text.
Legibility
It is possible to create a color overlay in HTML. The added benefit is that the color can easily be modified and adjusted. Heck, it could even be dynamic. When I tried to do this, though, I ran into issues with Internet Explorer (if you still care about IE). I tried using a CSS blend mode, but it ended up displaying as a solid color background, with no video at all. = No Bueno.
As a result, I would recommend including the overlay inside the video, then you have nothing to worry about.
Layering the Content, the Actual Code
OK! Layer up!
Let’s start with a wrapping `div`.
1
<div class="hero"></div>First, let’s focus on the HTML.
Inside, we’ll want two containers, one for our video and one for our content.
1
2
3
4
5
6
7
8
9
10
11
<div class="hero">
  <div class="hero__video">
    <!-- VIDEO -->
  </div>

  <div class="hero__content">
    <h1>Headline</h1>
    <h2>Subheading</h2>
    <a href="#" class="hero__button">Click me!</a>
  </div>
</div>
For the video HTML, I wanted to draw special attention to the actual video code. We’ll be using HTML5 video tag to make this nice and easy:
1
2
3
4
5
6
7
8
9
10
<video autoplay loop class="hero-video">
  <source
    src="https://s3.amazonaws.com/selfteaechme/example-video.webm"
    type="video/webm"
  />
  <source
    src="https://s3.amazonaws.com/selfteaechme/example-video.mp4"
    type="video/mp4"
  />
</video>
On the <video> tag, the autoplay attribute forces the video to immediately play. We’re looping the video and we’ve added a class name of hero-video so we can hook onto it within our CSS.
Nested inside is a <source> element, which allows us to specify all the video files that the browser can choose from. You’ll notice it includes a src and type attribute.
💡
NOTE
Looking for additional documentation on the HTML5 Video element on W3Schools is a great place to start.
The main attribute I want to point out that’s not used in our example is the controls attribute. It gets added to the <video> tag if you want to display video controls, like play, pause, and volume. — Obviously, this is unnecessary for the background video.
Sweet! OK, now all the code together:
1
2
3
4
5
6
7
8
9
10
11
12
13
14
15
16
17
18
19
20
<div class="hero">
  <div class="hero__video">
    <video autoplay loop class="hero-video">
      <source
        src="https://s3.amazonaws.com/argen-public-files/videos/argen-homepage-video.webm"
        type="video/webm"
      />
      <source
        src="https://s3.amazonaws.com/argen-public-files/videos/argen-homepage-video.mp4"
        type="video/mp4"
      />
    </video>
  </div>

  <div class="hero__content">
    <h1>Headline</h1>
    <h2>Subheading Content</h2>
    <a href="#" class="hero__button">Click me!</a>
  </div>
</div>
If you look at what we have within the browser, hopefully, you’ll see your video, automatically playing, followed by the content below. Now, let’s add some styles and make it “pretty.”
Let's add some custom fonts. I'm going to pull in
- Teko, a compressed font, for the heading
- Nunito, a sans-serif font, for the subheading
1
@import url("https://fonts.googleapis.com/css2?family=Nunito:wght@700&family=Teko&display=swap");Let's start by removing the default page margin and padding. Out of the box, you have a small white border around the entire page. We want our background to be flush with the edge.
1
2
3
4
html, body {
  margin: 0;
  padding: 0;
}
Styling the text content is pretty easy. With CSS, we’ll position the content on top of the video. Remember, .hero__content wraps our headline, subheading, and button.
1
2
3
4
5
6
7
8
9
10
11
12
13
14
15
16
17
18
.hero__content {
  display: flex;
  flex-direction: column;
  justify-content: center;

  text-align: center;

  height: 100vh;
  width: 100%;

  position: absolute;
  bottom: 0;
  left: 0;
  right: 0;
  top: 0;

  z-index: 3;
}
Let's talk through it:
- I used
flexboxin order to get the content to center horizontally and vertically. — Flexbox is awesome and easy, like that.display: flex;let's use use flexboxflex-direction: column;allows us to stack the content instead of aligning it horizonotally.- Since we've changed the flex direction,
justify-content: center;centers our content vertically.
- We can use
text-align: center;to center the text. - We want the content to fill the screen. so, we're using
width: 100%andheight: 100vh - Then, we can
positionitabsolutely and sayleft - Lastly, we want to make sure that text is on top of everything else with
z-index: 3;
Next up, let's add some additional styles to h1, h2, a tags to format the text.
1
2
3
4
5
6
7
8
9
10
11
12
13
14
15
16
17
18
19
20
21
22
23
24
25
26
27
28
29
30
31
32
33
34
35
36
h1 {
  font-family: Teko;
  font-weight: bold;
  color: white;
  text-transform: uppercase;
  font-size: 100px;
  line-height: 1;
  margin: 0;
  padding: 0;
}

h2 {
  font-family: Nunito;
  font-weight: normal;
  color: white;
  text-transform: uppercase;
  font-size: 42px;
  padding: 0;
  margin: 0;
  line-height: 1;
  margin-bottom: 10px;
}

a {
  background: magenta;
  border-radius: 3px;
  display: inline-block;
  font-weight: bold;
  font-size: 18px;
  margin: 0 auto;
  padding: 15px 30px;
  text-decoration: none;
  text-transform: uppercase;
  color: white;
  font-family: monospace;
}
These are pretty basic. For the h1 and h2, we're assigning a font-family and changing the color, font-size, and line-height. We also adjusted the default margin and padding and forced the text to all be uppercase.
The a tag is the button. But, it's not an actual form button. It's simply linking to another page. Therefore, in order to be semantic, it should be a tag (not a button).
Now, for the video.
Within our CSS we want the video to be full width. The trick here is making sure it fills the screen, but also scales with the browser window. When I’m doing this with background images, my favorite trick is background-size: cover;
I’ll show you with the fallback image:
1
2
3
4
5
6
7
8
.hero__video {
  background: url("video-fallback.jpg") center center no-repeat;
  background-size: cover;
  display: block;
  height: 100%;
  width: 100%;
  z-index: 1;
}
background-size: cover; makes the background image cover the area regardless of the dimensions, without distorting the image itself. This method is so much easier to implement than trying to work around the background-size: 100% auto; or background-size: auto 100%;. But, depending on what device you’re using, auto can create some undesired effects.
While this works for background images, it doesn't work for video. Before you throw your computer across the room, let me introduce you to another property that is equally as powerful: object-fit. And luckily for us, it works similarly.
Object-fit is intended for images, videos, and other embeddable media. (Reference CSS-Tricks). Plus, you can use it in conjunction with object-position -- which will allow you to center the video vertically and horizontally.
1
2
3
4
5
6
7
.hero__video video {
  object-fit: cover;
  height: 100vh;
  object-position: center center;
  width: 100%;
  z-index: 2;
}
We're also going to add styles to make the video fill the screen: height: 100vh and width: 100%.
Lastly, we want to make sure that the video appears below the content: z-index: 2;
Altogether, now. The final demo on CodePen:
You made it. Woo hoo!

Comments
This industry moves fast, but you can stay up to date:
Receive a weekly email of the Internet's best from articles, to tutorials, to pro tips.