


git
Every once in a while, you might make a wrong commit. — Plenty of reasons for that: wrong commit message, meant to add more files to your commit, bad code. Do I really need to go on? Today, we're going to talk through how to correct a bad commit.
When fixing your code or your commits, there are several different options, based on whether that code has been committed locally or pushed remotely.
I think this is easier to explain when you're working with actual project files. After all, that mirrors real life...
I have a few files posted on GitHub that we can use as a starting point. This is based on the Jokes project we worked on in the last git video.
On your computer, open up the Terminal. You can either use the built-in Terminal that comes pre-installed on your Mac — or, you can be fancy like me and use a program called Hyper. You can download it for free. I'll include a link in the description below, as well as a link to the Cobalt2 Theme that I'm using.
Within the Terminal, go to the folder where you want your files to live. If the Terminal makes you feel a little queasy, don't worry, this isn't as scary as it sounds. I can show you a little trick...
Type cd to where you want within Finder and then click and drag the folder onto the Terminal. It will automatically copy the path for you. Then, hit enter.
Since we already have a repo online that we want to use as a starting point, you can type:
1
git clone git@github.com:selfteachme/0007-fixing-bad-commits.gitWe haven't talked about clone yet, it allows you to download all the files from GitHub (or another online repository) onto our computer.
Before we get too far in, let's talk about the workflow.
You work out of your "working directory," where you add files, make edits, and move things around. Once you're ready to make a commit, you "stage" those files and write a brief message explaining what you did. When you commit those files, they're saved to your local repository.
In the last step, you can push those files up to an online repository, typically GitHub, BitBucket, or GitLab.
If you're smart — which I think you are — you'll notice several key areas in the process:
![]()
- Your working directory
- Local Repository
- Remote Repository
With that in mind, there are several different scenarios and options for correcting a bad commit, depending on where you are in the process.
- Your Working Directory
- Before you stage your files
- After you stage a file
- Local Repository
- Before you've pushed your changes up
- Remote Repository
- Without history modification (preferred way)
- With history modification — if you're working with a team, this requires a little bit of coordinating and forced pushes.
Scenario #1: Before you stage your files
Let's open the code within VS Code that we downloaded from GitHub.
Let's make some changes to our files...
Open jokes.txt. Let's add a new joke.
Add the following joke:
1
2
3
4
5
6
7
---

Knock, knock.
Who's there?
Tank.
Tank, who?
You're welcome.Now, We Haven't Committed Anything or Staged Anything.
I know we just added a simple joke, and it would be pretty easy to get back to the way things were, but just imagine, with me...
Sometimes, you may encounter a change that is beyond Cmd+Z
😱
Remember, if you're not sure what changes you've made, you can always type:
1
git status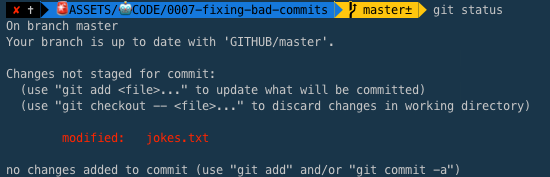
If you want to know what specific changes were made to that file, type:
1
git diff jokes.txt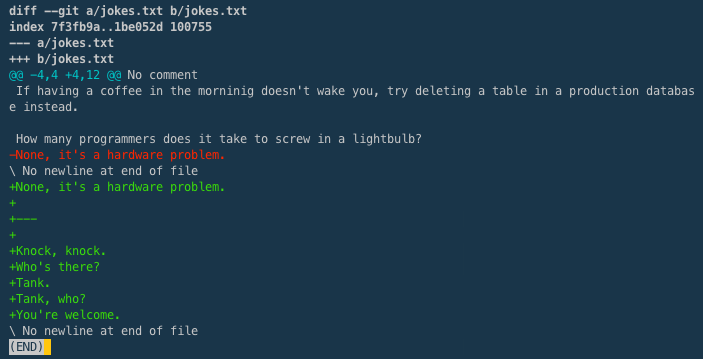
The part in green shows us what was added.
Hit :q to get out of this view.
You have 3 different options:
1 - Discard all local changes, but save them for re-use later, with stash:
1
git stash
If we open our jokes.txt file inside VS Code, it removed the last knock-knock joke we added.
Perfect.
If we ever wanted to add the joke back, we could always type:
1
git stash popThis will take the last stash you created and re-apply the changes.
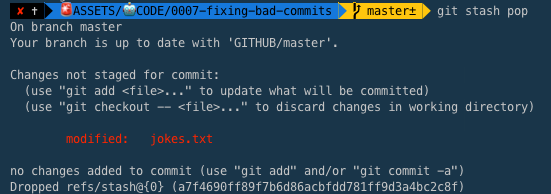
Open up VS Code, and you'll notice that the knock-knock joke reappeared.
If you use this technique a lot, it's helpful to actually name your stashes so that you can easily find what you're looking for.
Let's stash this again, but label our stash so we can find it.
1
git stash save "Added Tank who knock knock joke"Let's open up our jokes.txt file. The knock-knock joke is gone, but let's add a new joke:
1
2
3
4
---

What do you call a pig that does karate?
A pork chop.
Let's stash this:
1
git stash save "Pig Karate Joke"Awesome, now if we want to access a list of all the code that we've stashed, type:
1
git stash list
You'll notice that there a number next to all of the items in our list: stash@{0} we can use that number to apply a specific item on our list:
1
git stash apply 0I want to point out: if you run git stash list again, the item is still on the list. If you run git stash pop to apply the last item you stashed, it will be applied and removed from the list.
Let's look at another option. Say we don't want to save any of our changes. We just want to get our jokes.txt file back to the way it was originally.
2 - Permanently discard local changes to a file:
You can run this line from the Terminal:
1
git checkout HEAD filenameor in our case,
1
git checkout HEAD jokes.txtas a shortcut, you can also use -- instead of typing out HEAD:
1
git checkout -- filenameMaybe you're wondering, what is HEAD?
The HEAD is the current commit that you're on.
I'll show you what I mean. I'm going to add a new joke to jokes.txt
1
2
3
4
---

Why can't a nose be 12 inches long?
Because it'd be a foot.
Maybe you're wondering, what is HEAD?
The HEAD is the current commit that you're on.
I'll show you what I mean. I'm going to add a new joke to jokes.txt
1
2
git add jokes.txt
git commit -m "Added a knock knock joke"
Maybe you're wondering, what is HEAD?
The HEAD is the current commit that you're on.
I'll show you what I mean. I'm going to add a new joke to jokes.txt
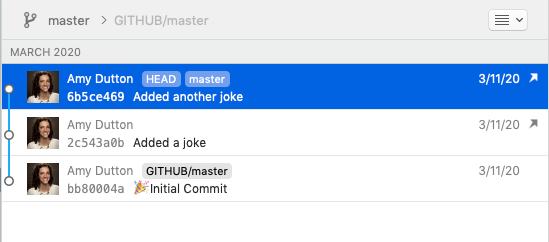
You can see the most recent commit I made has a "HEAD" label right next to it.
If I "checkout" the previous commit, you'll see the "HEAD" label appears next to the commit I'm looking at.

I'm going to jump back to our most recent commit.
In the Terminal, to see the head commit, type:
1
git show HEADLet's look at the last command we used within our Terminal, again:
1
git checkout HEAD jokes.txtHopefully, this will start to make sense. You're essentially saying that you want the HEAD to go back to the way you had jokes.txt
When you're in your working directory, the last option you have is to
3 - Permanently discard all local changes to all files
Let's add another joke to our file:
1
2
3
4
---

Why did the turkey cross the road twice?
To prove he wasn't a chicken.
Give our file a save. Then, within the Terminal run:
1
git reset --hard
Now, if you open up VS Code, you'll notice the last joke we added is no longer there, and the file was reset to the previous commit.
Scenario #2: Unstage a file that you haven't committed
Let's consider another scenario.
Let's go back to our jokes.txt file.
1
2
3
4
---

Why did the bike fall over?
Because it was too tired.
Let's stage this file to be committed.
1
git add jokes.txtWhoops!
What if I wanted to add another joke to this file instead of committing it. We've already staged the file.
We can run:
1
git reset HEAD filename
You'll notice there's an M next to jokes.txt, which is short for "modification."
You'll also see the common shortcut:
1
git reset -- filenameIf you look at our file inside VS Code, you'll notice it looks the same. Nothing changed.
If we run
1
git statuswithin the Terminal, you should see this:
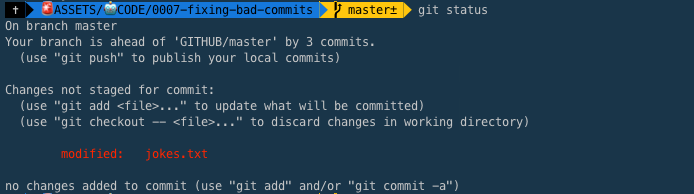
You'll see that jokes.txt is listed under the section that says, "Changes not staged for commit."
In our project, we're only working with one file, but if you want to unstage EVERYTHING, you can use:
1
git resetWe can also use some of the commands we used earlier.
For example, git stash will also work — allowing us to save our local changes for later.
Or, if we want to get rid of everything permanently:
1
git reset --hardScenario #3: You've committed the changes locally but haven't pushed them
Since you've committed your changes, they have been recorded by your local repository. But, since you haven't pushed your changes yet, they're not public. At this point, it's a lot easier to correct things quietly.
Option 1: Without Modifying History
You can go back to a specific commit.
1
git revert commit-idHow do you figure out what the commit-id is?
Let's run git log
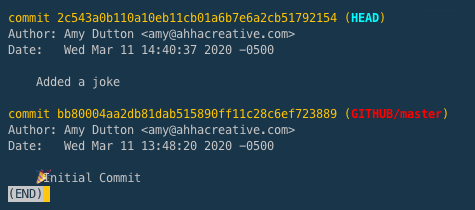
You'll see the word commit and then a random string of letters and numbers. That string is the entire commit-id. — Kind of crazy. To run our command, tho, we only need the first 7 characters.
So, if we wanted to go back to the second commit we made, we can type:
1
git revert 2c543a0 and if we wanted to go back to a specific commit for a specific file, we can add the file name to the end:
1
git revert 2c543a0 jokes.txt
Options 2: Modifying History
When modifying the history, there's one command you need to know:
1
git rebaseYou can use the -i flag, which will enable you to do several things.
Reword Commit Messages
Let's reword a previous commit message:
1
git rebase -i 6b5ce46Remember that 6b5ce46 is the commit hash.
It will open up a file within the Vim text editor in our Terminal. I can type i to go enter INSERT mode. If you look at the bottom left corner, you'll see --INSERT--
On the commit I want to change, I'm going to change pick to edit , then I'll leave all the others as pick.
Then, I'll hit the ESCAPE key to exit "insert" mode. You'll see my cursor appear at the bottom of the screen. I'll type :wq — w means "save" and q means "quit"
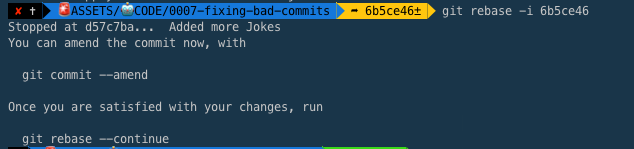
You'll see my Terminal gives me a few commands to run.
1
git commit --amendThis puts me back in Vim, where I can modify the commit message.
I'm going to make this commit a little more descriptive.
Now, I'm going to hit the ESCAPE key and :wq again.
Now, let's run that last line:
1
git rebase --continue
If we run
1
git logYou'll also see our commit message has been updated:
I should also mention, if you just want to modify the last commit message you made, you can type:
1
git commit --amendThis will open the last commit message within Vim for you to edit — a heck of a lot easier!
Drop Commits
Another option is to drop or delete a commit completely.
Within the Terminal, I'm going to use:
1
git logWe can see a list of all the commits we've made:
I want to get rid of the most commit we've made. I'm going to go ahead and copy the commit hash.
To exit this view, I'm going to type :q
Now, with the Terminal, I'm going to type
1
git rebase -i A list of recent commits is going to appear within Vim. The last item in the list is the most recent commit that I made. I'm going to delete it by changing pick to drop.
Now, I'm going to hit the ESCAPE key and type :wq to save and quit.
Now, when I get back to the command prompt, I'm going to type
1
git logand you can see that the last commit I made is no longer listed.
Squash multiple commits into a single commit
Another option we have with git rebase is squashing commits. This might sound weird, but all it means is say you have 5 commits, you squash all those changes into a single commit.
Maybe that sounds like a terrible idea...why would you ever want to get rid of your git history? You probably don't if it's a personal repository that you're working on. But, if you're working with a large team or on an open-source project, your repo history is cleaner when there's a single commit for each feature.
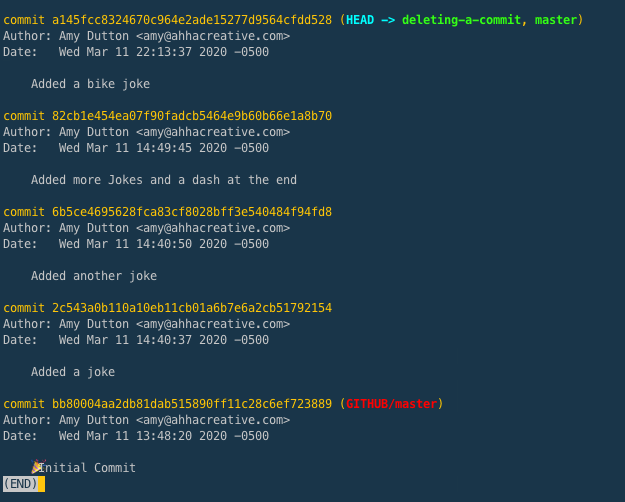
I'm going to type
1
git logSo you can see my git history. I've made several commits.
To squash these, within the Terminal, type:
1
git rebase -i bb80004Here, bb80004 is referencing the very first commit I made.
Similar to before, it's going to open Vim within the Terminal. Here, we want to squash all the commits into a single commit. You can only squash into a previous commit. Within this view, the first commit in the list is the oldest. We want to squash all of our commits down into this one. You can't squash up.
I'm going to change all the commits I want to squash from pick to squash. I'm going to type i to get into insert mode. Now, I can edit and change all these instances.

Hit the ESCAPE key, then type :wq to save and close.
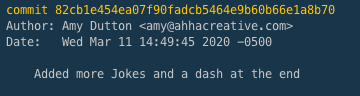
Now, within the Terminal, I'm still in VIM, but it displays a commit message that it created for me. You can keep this text, or you change the text to be whatever you want. I'm actually going to create an entirely new commit message.
I'm not in INSERT mode. I'm going to hit Shift+D. This will delete all the contents on a single line.
With all the content gone, I'm going to the i key to go into INSERT mode and delete all these extra lines and write a new commit message
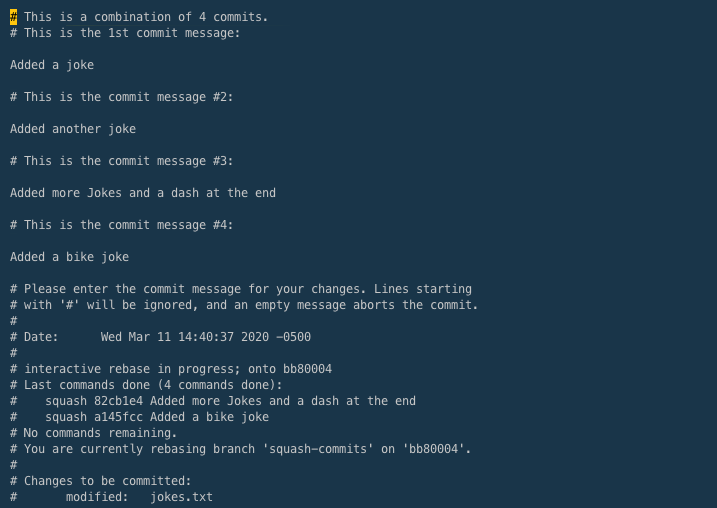
1
Added a bunch of jokesHit ESCAPE and :wq — You're starting to get the hang of this!
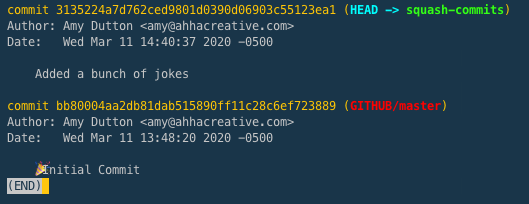
Now, when we go back to the command prompt, I'm going to type:
1
git logAnd you'll see our commits have been squashed down into a single commit.
Scenario #4: You've committed and pushed everything
In the last scenario, you've committed and pushed your changes to GitHub, but you want to go back and change something.
There are 2 ways you can do this:
- Without changing the history — this is the suggested way
- Changing the history — this is discouraged because someone on your team could already have the "bad" code on their computer. The whole point of using git is tracking your changes and make sure everyone's code is up to date.
Without Changing the History
Let's look at the first option, also the right way, of doing things — without changing the history.
Let's first look at our git log, so we know what we're working with:
1
git logI'm going to grab the commit-id for the item I want to go back to. I'm going to type :q to get out of this view. On the command prompt, I'm going to type:
1
git revert a145fcc8324670c964e2ade15277d9564cfdd528
You'll notice that I ran into an error! 😱
This is actually a merge conflict. We'll get more into this in a future video when I talk about working with a team. But, don't let this scare you. The easiest way to resolve this is to open up jokes.txt within VS Code:
In the file browser, VS Code has put a "C" to let me know there's a conflict.
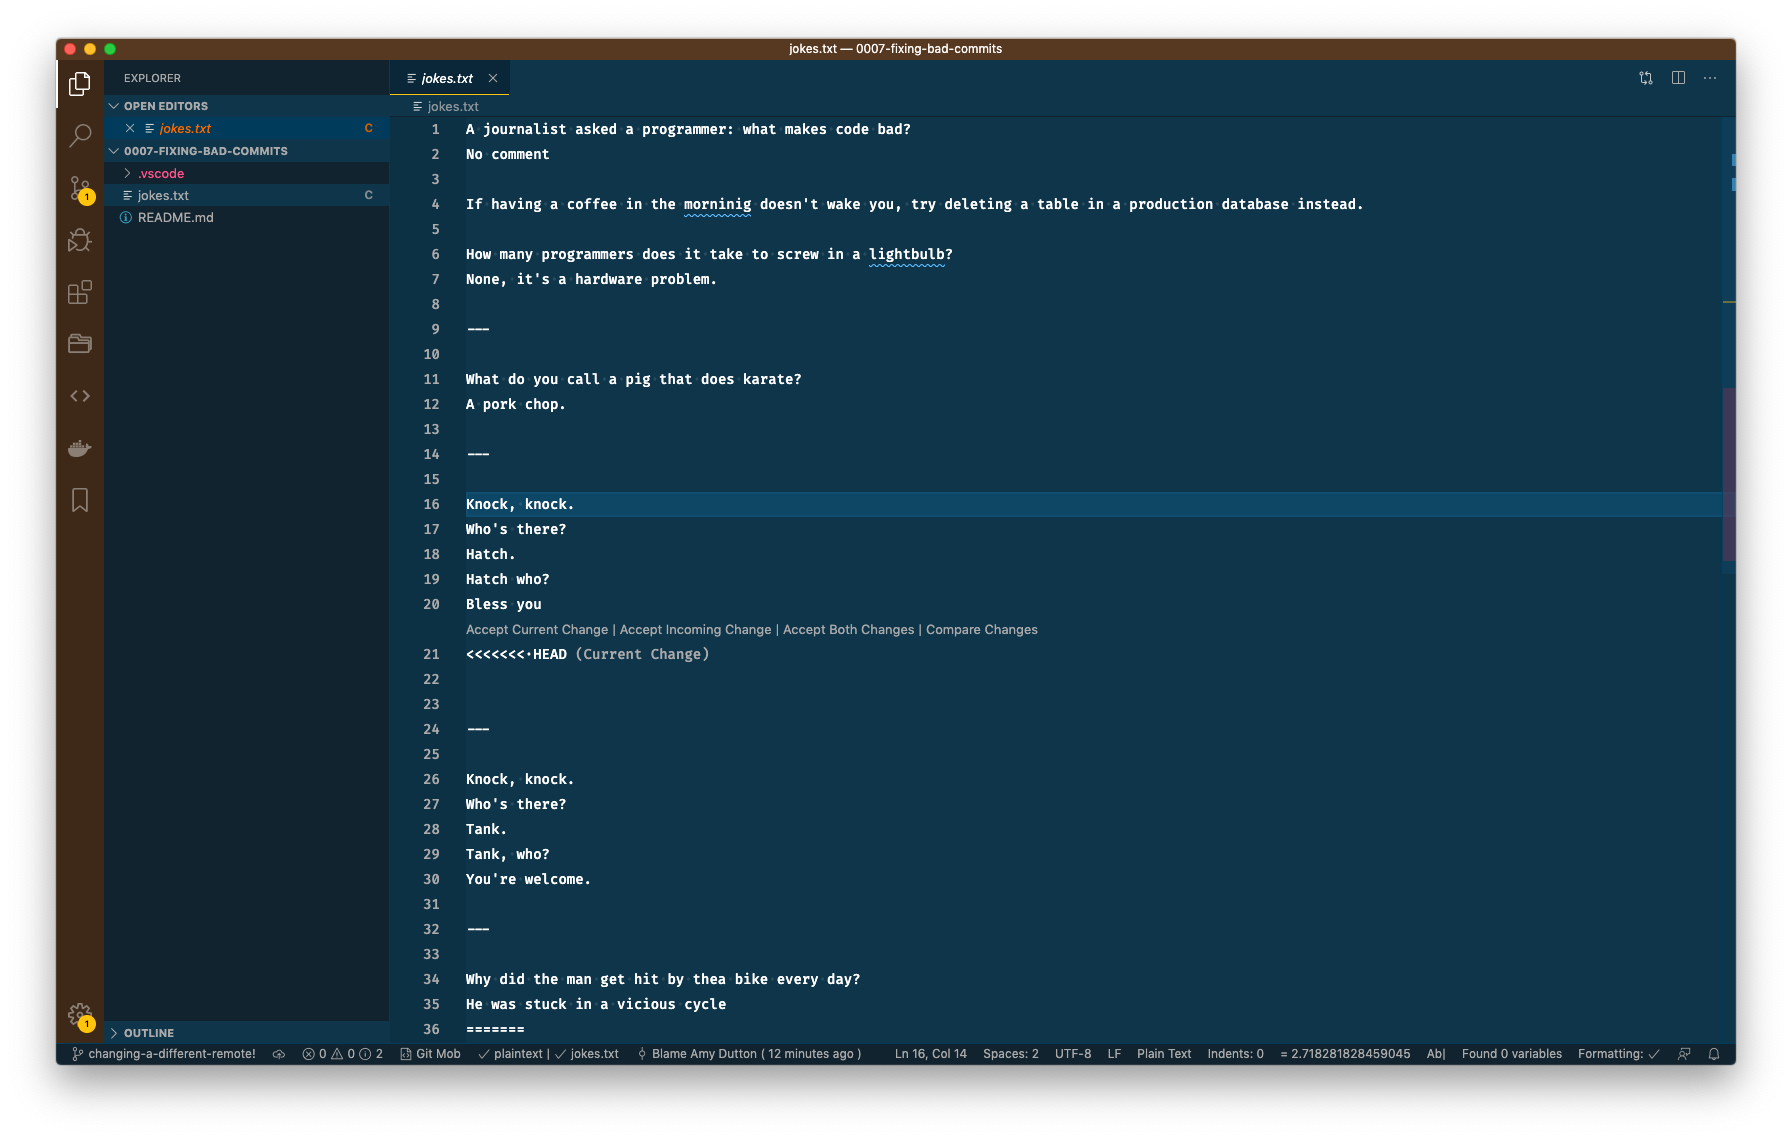
When I open this file, at the end, there's a <<<<<<< HEAD and this
1
2
=======
>>>>>>> parent of a145fcc... Added a bike joke
Basically, it's telling me, we're not sure what to do with these lines of code, what you want to keep, what you want to get rid of.
Delete these lines and get the text to look how it should.
Then, you'll stage these files and commit them like we have been doing:
1
2
git add jokes.txt
git commit -m "Fixed jokes"
Another way is to use branching. This is generally THE BEST way when dealing with these types of issues.
We'll talk more about branching in a future post, but here's the Clif Notes:
We've been working off the master branch. Generally, this is the main, production-ready branch. But, when you're working on different feature sets or with a team, it's a good idea to work off a different branch.
You can think of a branch as a copy of your code that doesn't interfere without the production code works.
In our case, we're going to check out a previous commit. Let's grab a commit hash:
1
git logI'll copy this commit and hit :q
Now, at the command prompt, I'm going to type:
1
git checkout a145fcc8324670c964e2ade15277d9564cfdd528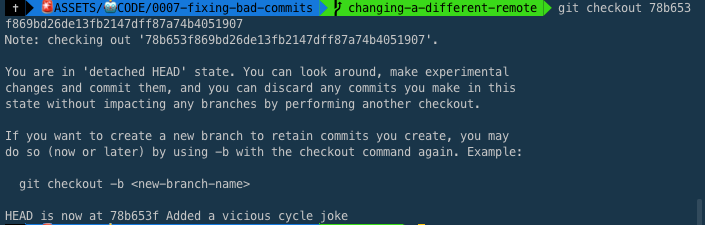
You'll notice, I get a scary message about a "Detached HEAD" — I know it sounds serious. All it's saying is that we're no longer on a branch. We have a single commit in the history.
Don't worry. We're going to put this on its own branch so that we can make changes and eventually "merge" it back into the master branch.
1
git checkout -b add-more-jokes
Now, instead of being on the MASTER branch, we're on the add-more-jokes branch. We can open our jokes.txt file and make all the changes we want. I'm going to add another joke:
1
2
What do you call a fish without eyes?
Fsh.
Now, let's stage it and commit it:
1
2
git add jokes.txt
git commit -m "Added a fish joke"
Last step!
We need to go back to our master branch and merge our new code in:
1
git checkout masterYou may have noticed, in my Terminal, it actually tells me what my current branch is.
1
git merge add-more-jokesDone.
Changing the History
I highly recommend avoiding this scenario. The whole point of git is to maintain your project's history. Really, there are only a few instances where this is acceptable.
- Earlier, I mentioned squashing a feature's commits into a single commit. Again, this is helpful when you're working on a large team or an open-source project. Even then, you might not want to squash the commits until your code has been approved in code review.
- The second instance is if you're trying to remove sensitive information. This can still be tricky and isn't foolproof. — It's better if passwords and credentials are never committed to your repository in the first place.
When you change the history, you'll use a similar process to git rebase -i. But, when you push the code, you'll need to use the --force flag.
You should make your team aware of these changes to ensure they're working on the correct version.
All the code is posted on GitHub. Feel free to download it, play with it, modify it, share it, use it, whatever. Have at it!

Comments
This industry moves fast, but you can stay up to date:
Receive a weekly email of the Internet's best from articles, to tutorials, to pro tips.