


git
In this video, we're going to walk through how to use git and what it looks like to use it on an actual project.
If you're not even sure what that is or how to get it installed on your computer, check out my other video. — Link in the card and the description below.
Creating a Project
Let's set up an actual project, walking step-by-step.
I'm going to create a new folder on my computer called "learning-git". This will be our project folder.
![]()
Let's open this folder within VS Code.
![]()
Let's open this folder within VS Code.
1
2
A journalist asked a programmer: what makes code bad?
No comment
Give that a save.
Let's make this folder a repo.
🤔
What's a repo? Repo is short for repository. This contains all your project files and all the information about its history.
To INITIALIZE the repository,In the Terminal type go to your project file.
1
git init
Done and done.
Still in your Terminal, type:
1
ls -laThe ls command says list everything in the current directory. Usually when you see a dash in the Terminal, it's called a flag. All that means is that you're providing additional parameters for how you want the information displayed or handled. In our case, the -l means long format and will show the permissions. -a means show hidden files.
You should see something like this:

So, when look at the list of all the files in our directory, you'll notice that our git init command created a folder .git
If you open your project within Finder, you won't see this folder. That's because it starts with a . and is hidden.
This .git directory is where all your repo information is. If you delete that folder you remove git from your project.
One thing I do want to point out. Even though we've initialized git for this folder, it's an empty repo. We haven't committed anything to it. Even though our jokes.txt file lives in our project directory, it's still not part of our repository. — So, let's add it.
But first, before we get too much further, let's talk a little about the workflow:
Basic Workflow
You can think of your computer like this:
![]()
You have a working directory. This is where you do all the work: creating, editing, deleting, and organizing files. — And actually, with jokes.txt that's where we've been: in our working directory.
Once we get to a point where we're ready to save, we move this file into a "staging" or prep area so that git knows, this file is coming. As we're prepping this file to be committed, we include a brief message that says what changes were made.
![]()
Then, the files that have been committed are part of our local repository. This is where git permanently stores our changes as different versions of the project.
In the last step, we push those changes to the our remote repository. This is where our files and all our changes live online, usually with a service like GitHub, BitBucket, or GitLab.
Seems straight forward enough, right?!
Now, let's walk through what that actually looks like in the command line.
Remember, we've already initialized our project, so now I'm going to type:
git status
As you might have guessed, this command tells us the current status of our working directory.
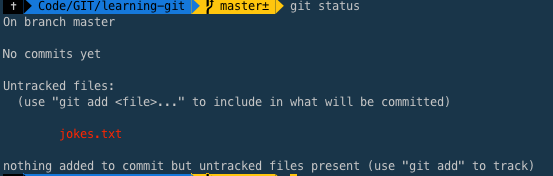
You can see that it's listed one file, jokes.txt as Untracked. Don't worry, untracked just means that we haven't tracked any changes on this file yet. It's a file within your working directory that hasn't been committed yet.
Staging Changes
Let's prep this file so we can commit it. We need to add it to the staging area.
Within the Terminal we want to type
git add filename
in our case, that means: git add jokes.txt
As a quick aside, if you have a bunch of files that need to be committed, instead of adding them all one-by-one, you can add all at once with git add . — That . means everything.
Committing
Perfect, now we need to commit our changes and add a brief message explaining what changes we made and why.
Within you Terminal:
git commit -m "Change Message"
The rules for writing commit messages is that they
- Must be in quotation marks
- Written in the present tense
- Should be brief (50 characters or less) when using
-m
As a quick PSA: "Updates" is not a good commit message! Of course you're making updates! That message doesn't help anyone!
When you're writing a commit message, you want to it to explain what you did and why it was necessary.
Sometimes its easy to get within 50 characters or less, other times its more challenging. If you need to write more. There are some conventions for that (surprised?)
Within the Terminal, type git commit, leaving off that -m "Commit Message" This will open a text editor within your Terminal. This editor is called Vim. At first this might seem a little overwhelming, but have no fear! We won't be here long and there are only a few things you need to know:
To add text, hit I — this puts you into "insert" mode. In fact, you'll --INSERT-- in the bottom left corner.
When writing your message, there are 2 sections — a header and a description. The first line is the header, this is that 50 character title. Skip a line, then write the description. Technically, your description can be as long or as short as you want it to be.
The main you want to keep in mind when writing commit messages is if someone came behind you, they'd be able to tell what you did and why.
Once you've written your message in Vim, hit the ESCAPE key. Then type :wq. The w means save and the q means quit.
Now, within the Terminal, we can check what we just staged and committed:
git show
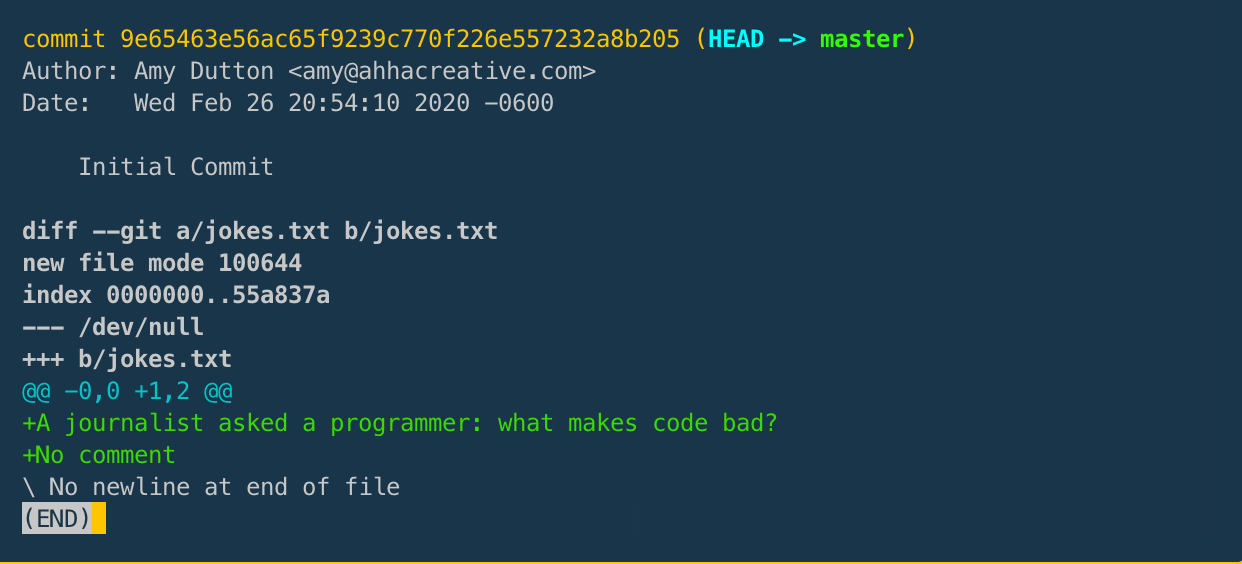
When you want to exit out of this view, type :q
Making Changes
Let's open up our jokes.txt file and add a new joke:
1
2
If having a coffee in the morninig doesn't wake you,
try deleting a table in a production database instead.
Give that a save.
Now, when the Terminal, let's run git status.
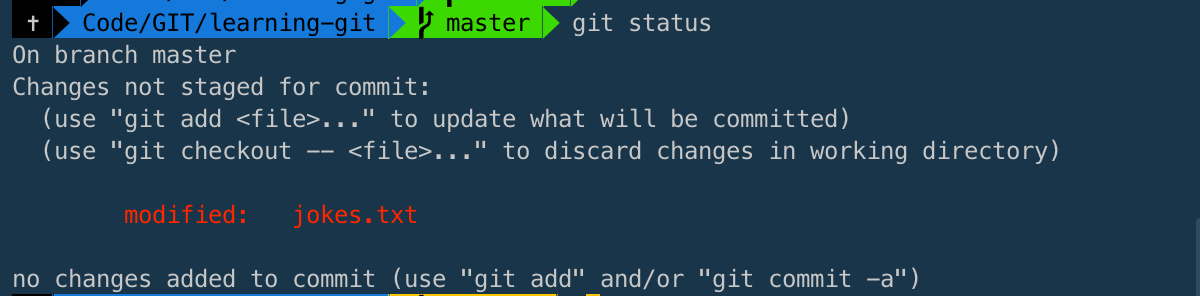
We can see that we've modified jokes.txt. If you want to see exactly what changes were made, type: git diff filename
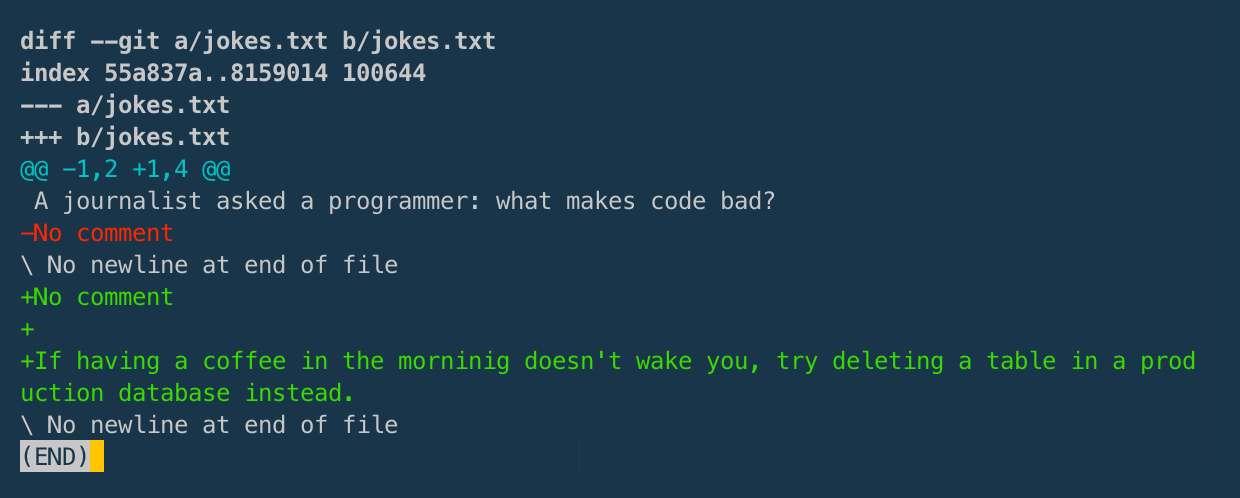
You can see that the part in green is the new joke that we added.
Let's use the exact same process as before, to add the this file to staging and commit it to our repository:
1
2
git add jokes.txt
git commit -m "Added a joke"
If you want to see a history of the changes that you've made you can go to the Terminal and type:
git log
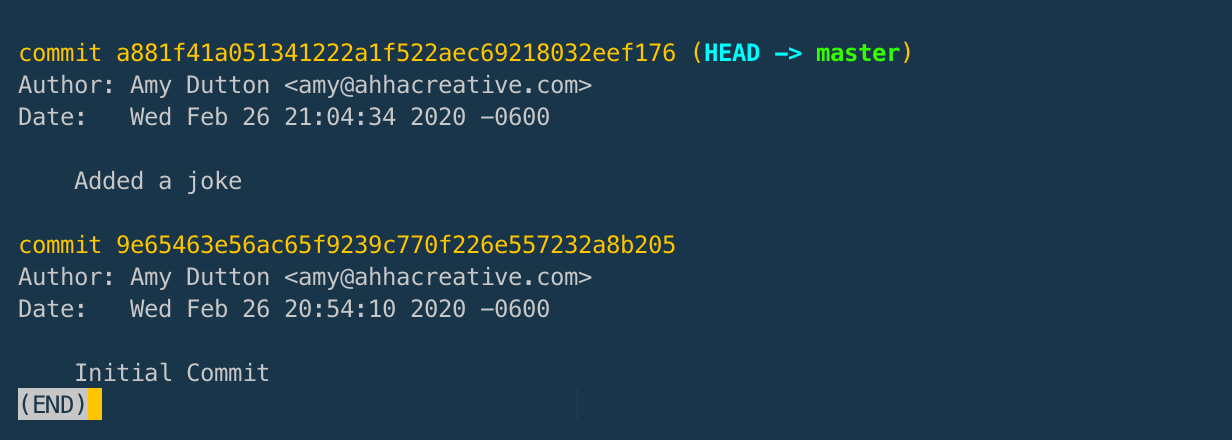
You can see, we've made 2 commits:
- The initial commit
- Added a joke
Awesome! Now, the last step is to put our repo online. Let's setup a GitHub account and post our code there.
Setting up a GitHub account
It's very easy to set up a GitHub account. Just head over to github.com. The sign-up form is right on their homepage. If you go there and you get some A/B Test where it's not on the homepage, there's a sign-up button in the top right corner.
This is pretty obvious, but fill out the form, prove you're not a robot, answer some questions, and pick a plan.
GitHub will let you have an unlimited number of public repositories. If you want to create a private repo, you'll need a paid account. For now, I'm going to go with the free ninety-free.
Last step: confirm your email address.
After I confirmed my email address, it assumed I would immediately want to create a repository. — convenient, because I do.
The first thing that you'll see is that git asks for a Repository Name. I'm going to our repo learning-git but you can call it whatever you want.
The description field is optional. But, I usually like to fill this in.
We want "Public" for this project, but usually, if I'm working on a client project, I'll select Private.
The next section says, "Initialize this repository with a README". All this means is, do you want GitHub to create a README file for you and automatically add it to your repository? I usually leave this unchecked because I think it's easier to create this file within your project. — But, don't worry we'll come back to this!
Now, click the Create Repository button at the bottom.
If everything went through successfully, like it should, you should be redirected the repository page. This page is really helpful when you're first learning git because it tells you what commands you'll need to run in the command line. There are a few different scenarios. — if you know what you're doing and just want the address, you can grab that at the top. If you're trying to create a new repository from the command line or if you're trying to push an existing repository from the command line. Hey! That's us.
Let's copy those lines and the paste them into our Terminal.
1
2
git remote add origin https://github.com/theamydutton/learning-git.git
git push -u origin master
The first line says that you want to add a remote connection to your repository. Usually, the remove is called the origin. Sometimes, I'll change this to be GITHUB or BITBUCKET. Personally, I found this practice to be helpful when I was also hosting projects on BitBucket. It made it easier for me to remember where my code was going.
This first line, you only have to run once, when you're setting up your project.
Pushing
The next line, actually pushes your code to GitHub. If you ended up changing origin to GIITHUB, then in the second line, you'll want to make sure you say:
1
git push -u GITHUB masterOK, when I run this line, you'll see that it asks for a passphrase for my keys. I'll cover this in a future video, but yours will probably ask for your GitHub username and password. Just a slight difference, no big.
Sweet! Now, all your files exist online. If something were to happen to your computer, then you'd still be able to get your project back.
I promised we'd come back around talk about that README file.
A README is a file that sits in the root of your project. It usually has a .txt or .md (for Markdown) extension. All it does is introduce and explain your project. Generally, it will talk through the tech on your project, how to get it up and running, or information someone might need to know when working on the project.
In general, it's always good to create this file.
If you're working on a team, this file generally serves as documentation for onboarding new team members.
I also use it on solo projects, though. Be kind to your future self. You think you'll remember how you set up a project or "house rules" for that project, but trust me, 6 months from now, 1 year from now, you'll forget.
GitHub will automatically display the contents of a file named README.txt if your project has one.
Let's look at a few projects that I've worked on to give you an idea of the types of things you'll want to include.
SelfTeach.me Gatsby Repo
This is a modified version of the boilerplate README that Gatsby creates.
At the very top, there's a section that tells you the tech that you'll need on your computer in order to run the site: Node and Gatsby Command Line Tool.
Next up, there's a Quick Start section that explains how to update the project as quickly as possible and where to go to within the browser to view your project.
The "What's Inside" section tells you the folder structure of the project. I know the project is constantly changing, so the point of this section is not to outline every single file within the project, but to give a 1,000 foot level view of the directory structure.
Think about it this way: if this project needed to be handed off to someone, what knowledge transfer would need to happen?
If I keep on scrolling down, I have information about how to deploy the site. In this case, the project is being hosted with Netlify so anytime a change is pushed to the master branch, the site is automatically deployed.
📣
PSA
Never put your usernames and passwords into the README. Remember that git tracks all your files and file history. So, even if you include that information in your README with the intention of removing it later, someone could still go back in your version history and find that password information. —Better just to leave it out, altogether.
The next 2 sections, I included a few command lines that you can run within your project from the Terminal. — how to clean and build.
Then, the last section is some domain knowledge. For this project, all the forms are being processed through Netlify's Form feature. So, I wanted to make sure that was documented somewhere. — Remember be kind to your future self.
Within our practice project, let's create a README.md in the project root.
Since this is just a text file, we don't have much to add. We'll keep it short...
1
A few programming and code jokes.Now let's go through the same process as before to commit our README to our repository and push it up to GitHub.
1
2
3
git add README.md
git commit -m "Added a README.md"
git push
Awesome, now let's jump over to GitHub, and you can see it's GitHub automatically displays its contents below our file listing.
![]()
What does this look like inside a GUI?
Before we call it quits, I want to show you what this workflow looks like in a GUI (Graphical User Interface). I went through different apps in my "What is Git?" Video.
My favorite app is Tower, so I'll be using that. Whatever you end up using, I'd imagine it's a similar workflow.
First, let's add our repository to Tower. It already exists on our computer, so no need to create a new one, I just need to point Tower to our folder. But, you can see, here, there's an option to create a new repository if I needed to.

I'm going to double click on folder to open it. You can see, here on the left side there are some quick links. I spend most of my time in the "Working Copy" section because that lists out the files that I'm working on.
Let's make a change to our jokes.txt file so that we'll have something to commit:
1
2
How many programmers does it take to screw in a lightbulb?
None, it's a hardware problem.
Give that a save.
If you jump back over to Tower, you'll see that the file is now listed as something that's changed. If I click on the file I can see exactly what changed. This is the same as running git diff jokes.txt
I'm going to click on the checkbox next to the filename to stage it. This is the asme as running git add.
Now, I'm going to type in a brief commit message.
1
Added a jokeNow, we can just hit the push button and away it goes. Tower has my GitHub information stored, so it won't ask for my username and password or keys like the command line does.
Well... actually... if you love the Terminal, you can actually cache your credentials so it won't keep asking you. I'll include a link in the description below.

This project is posted on GitHub. Feel free to download, use it, modify it whatever ... although, there's not much to this repo.

Comments
This industry moves fast, but you can stay up to date:
Receive a weekly email of the Internet's best from articles, to tutorials, to pro tips.