


I work for a remote company called Zeal. Git is an essential part of our workflow. There are a few things that we do every day that have become second nature that makes git a seamless part of our work.
Today, I'm going to highlight some of those processes.
git is a big part of development because it's one way that developers work together. If you're not sure what git is, why you would use it, how to get it installed, check out some of the other videos in this series.
One of the most important things for working with git as a team is...
One Feature to One Branch
I talked about this briefly in the branching video, but every feature or every bug should have its own branch. This allows multiple people to work on multiple features without ever overwriting each other's code. Plus, this helps keep things nice and organized.
Pushing Your Code
At the end of every day, we push your code. Even if our code is broken, we push our work in progress.
Why?
We're firm believers in paired programming. Our team is spread across four time zones. Naturally, the east coat starts working earlier than the west coast. The west coast ends their day after the east coast. This requires handoffs.
Not quite as common, but if someone on our team gets sick and has to take the day off, their pair needs to be able to continue to make progress. Otherwise, its 2 developers down, instead of just 1.
So... at the end of every day, push your code.
A lot of times that commit will look like this:
1
🚧WIP: A description of the work in progressThat WIP stands for "work in progress." — which is good communication. It lets someone know that you're not finished.
Pulling from Master
In that same vein, begin each day by pulling the most recent version of the code. Your pair may have made progress on a feature while you were out. You want to make sure that you're working from the most recent version of the code.
This isn't just pulling the code from the branch that you're working on, but, this also includes pulling from master. As features get added to the codebase and merged into master, you want to make sure that your code is current. Eventually, your code will get merged into master, too. If you get too far behind master, then when it comes time to merge your code in, you will inevitably hit a merge conflict.
We've talked about how to resolve a merge conflict, but, they're still not fun. It's just better for everyone if you'll just pull often.
Rebasing vs Merging
When it comes time to merge your code into master, REBASE instead of MERGE. Let me explain the difference.
In a typical workflow, we have our master branch. When we want to create a new feature, we'll create a separate branch, just for that code. When that feature is done, we'll merge it back into master. Simple and straight forward, right?
Plus, this graph represents history well.
This is fine and great, but what if you're working on a lot of bugs or features all at once. With a team, this is common. The graph can get pretty crazy and convoluted.
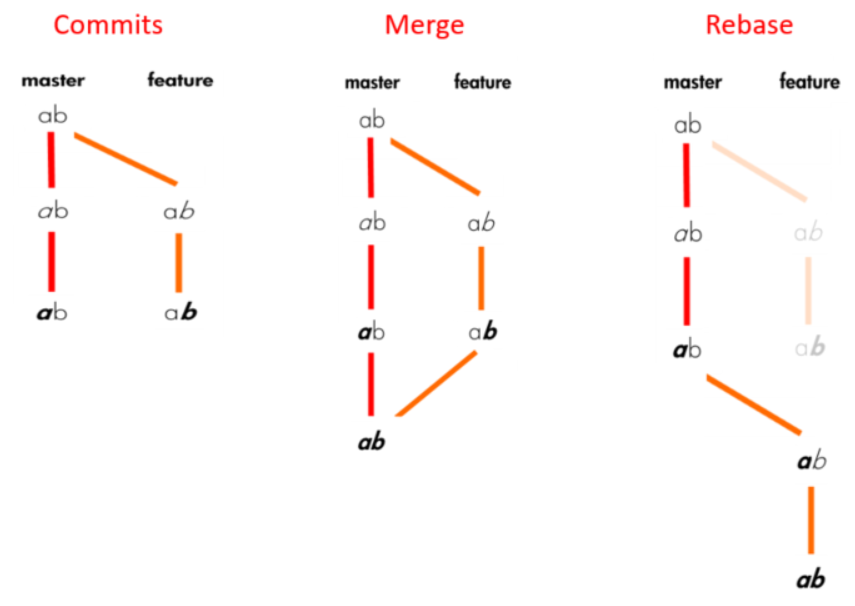
So, one of the that that we do instead is REBASE.
A rebase takes your commits and reapplies them with a new position. You're essentially moving your starting point, hence rebasing.
It will look like the code evolved in a single straight forward line.
To keep our history even cleaner, we'll also squash our feature into a single commit.
To be clear on the process, let's go back to our jokes repository that we've used in some of the previous git tutorials.
I want to add some new jokes, so I'm going to create a new branch:
1
git checkout -b "new-jokes"In VS Code, let's open our knock-knock-jokes.txt file and add this joke to the bottom:
1
2
3
4
5
Knock, Knock
Who's there.
Bed.
Bed who?
Bed you can't guess who I am!
Let's commit it.
1
2
git commit -m "Added a bed knock knock joke"
git push origin head
Now, let's add another joke to our riddles.txt file:
1
2
What is the capital of Washington?
W
Get it? The capital of Washington is a W.
Let's commit it and push it.
1
2
git commit -m "Added Washington riddle"
git push
Just for good measure, let's add one more joke.
Still in our riddles.txt file, let's add this to the bottom of our file.
1
2
Why couldn't the pirate play cards?
Because he was sitting on the deck.
Commit it.
1
2
git commit -m "Added a pirate joke"
git push
That's everything, so let's create a pull request.
On GitHub, let's click on the button. I'm going to title our PR, Added 3 new jokes. I've created a separate video on how to create a Pull Request.
Since these are just text changes, I'm going to keep this short and sweet. I'm going to delete everything except the feature description of what we did.
1
2
3
Added 3 new jokes:
- 1 knock knock joke
- 2 riddles
and submit it. Ideally, a team member would review our PR and give us feedback or approve it. Once it's been approved, we need to rebase and squash our commits.
I'm going to head back over to the Terminal.
I'm going to the master branch and make sure that I have the most recent set of code:
1
2
git checkout master
git pull
Ahh, some changes did get made! (I made some changes while you weren't looking, so it'd feel like a real project).
Now, we want to jump back over to our new-jokes branch
1
git checkout new-jokesLet's start rebasing:
1
git rebase -i masterIf you'll remember from the resolving merge conflicts video we talked about the -i. It means interactive and will bring up our vim editor.
We want to change the word pick to squash for all but the first commit. We're going to squash everything down into that single commit.
In Vim, we have to hit i in order to go into INSERT mode. Now, we can make our text changes.
Type ESCAPE and :wq to save and quit.
OK, we did hit a merge conflict in the process. Looks like it's in the knock-knock-jokes.txt file. Let's open it up the file in VS Code.
Let's remove these extra characters and get our file looking the right way. Save it.
Within the Terminal, we can type:
1
2
git add knock-knock-jokes.txt
git rebase --continue
Now, that the squash is finished, it wants us to edit the commit message. Remember, we want to keep our PRs small, so we should be able to summarize everything in a single commit.
Now, let's push our code.
1
git push💡
NOTE
You may have to use git push --force-with-lease, which will allow you to overwrite changes you have made but will be rejected if anyone else has made changes.
Now, we can go back over to GitHub and click the merge code button!
Co-Authors
As I mentioned earlier, we're firm believers in paired programming – which means, we're usually writing code with someone else through screen share. We want our commits to reflect that combined effort and not just document whose computer the code was written on.
Git has a feature for co-authors.
Within the Terminal, when you make a commit, you'll write out the command as usual:
1
git commit -m "Added a jokebut instead of closing the quotations, add 2 empty lines.
Then, use
1
Co-authored-by: John Doe <john@selfteach.me>their name and email address.
If you have more than one person, you can add another line, the same way:
1
Co-authored by: Jane Smith <jane@selfteach.me>"Then, close the quotes and hit enter.
If you use VS Code to handle all your commits, there's a plugin, called Git Mob that makes this even easier.
I'll show you. In VS Code, I'm going to go to the git tab. I can stage a change by clicking on the + button. I can type my commit message, here at the top. But, you'll also notice there's a section, down here, at the bottom called Git Mob Co-Authors. I can add any one of those people to my commit by clicking on the plus button and it will inject that Co-authored by line into my commit message.
If you want to add people to your Co-Authored section, it's really easy. Just click on this page icon and it will open your .git-coauthors file. If you're wondering, on a Mac this is saved inside your user folder. But, remember, since it starts with a period, it's not going to show up in your Finder.
With this file open, you can update the JSON. I'm using Jane's initials at the top, js and then I'm including her name and email address. If you want to add someone, the easiest thing to do is to copy this block, add a comma to the end, to separate the 2 entries, and paste. Then, update the information for the new person.
Give that a save and you'll notice the panel at the bottom update.
Once that commit has been made to GitHub, you'll see both avatars appear next to the commit.
Done!

Comments
This industry moves fast, but you can stay up to date:
Receive a weekly email of the Internet's best from articles, to tutorials, to pro tips.